Contributing Guide
- Contributing Guide
How to Contribute
This site was started by students just like you, and we need your help in keeping it up-to-date and adding new content. If you want to update this website, you can either:
- Edit the code directly, either on GitHub Desktop or with git
- Submit an issue ticket
- Fill out this information form and a website admin will update the website content.
Create an Issue Ticket
We always welcome new ideas, suggestions, and comments. You can add an issue ticket here. You will need to create a GitHub account to make an issue ticket.
Edit the Website Code with Github Desktop
You can edit the website directly following these steps:
- Create a GitHub account
- Edit the website content directly on GitHub Desktop
- Submit a pull request
1. Create a GitHub account
Go to GitHub and sign up. You’ll need to confirm your email address before you can do anything else.
2. Edit the website content directly on GitHub Desktop
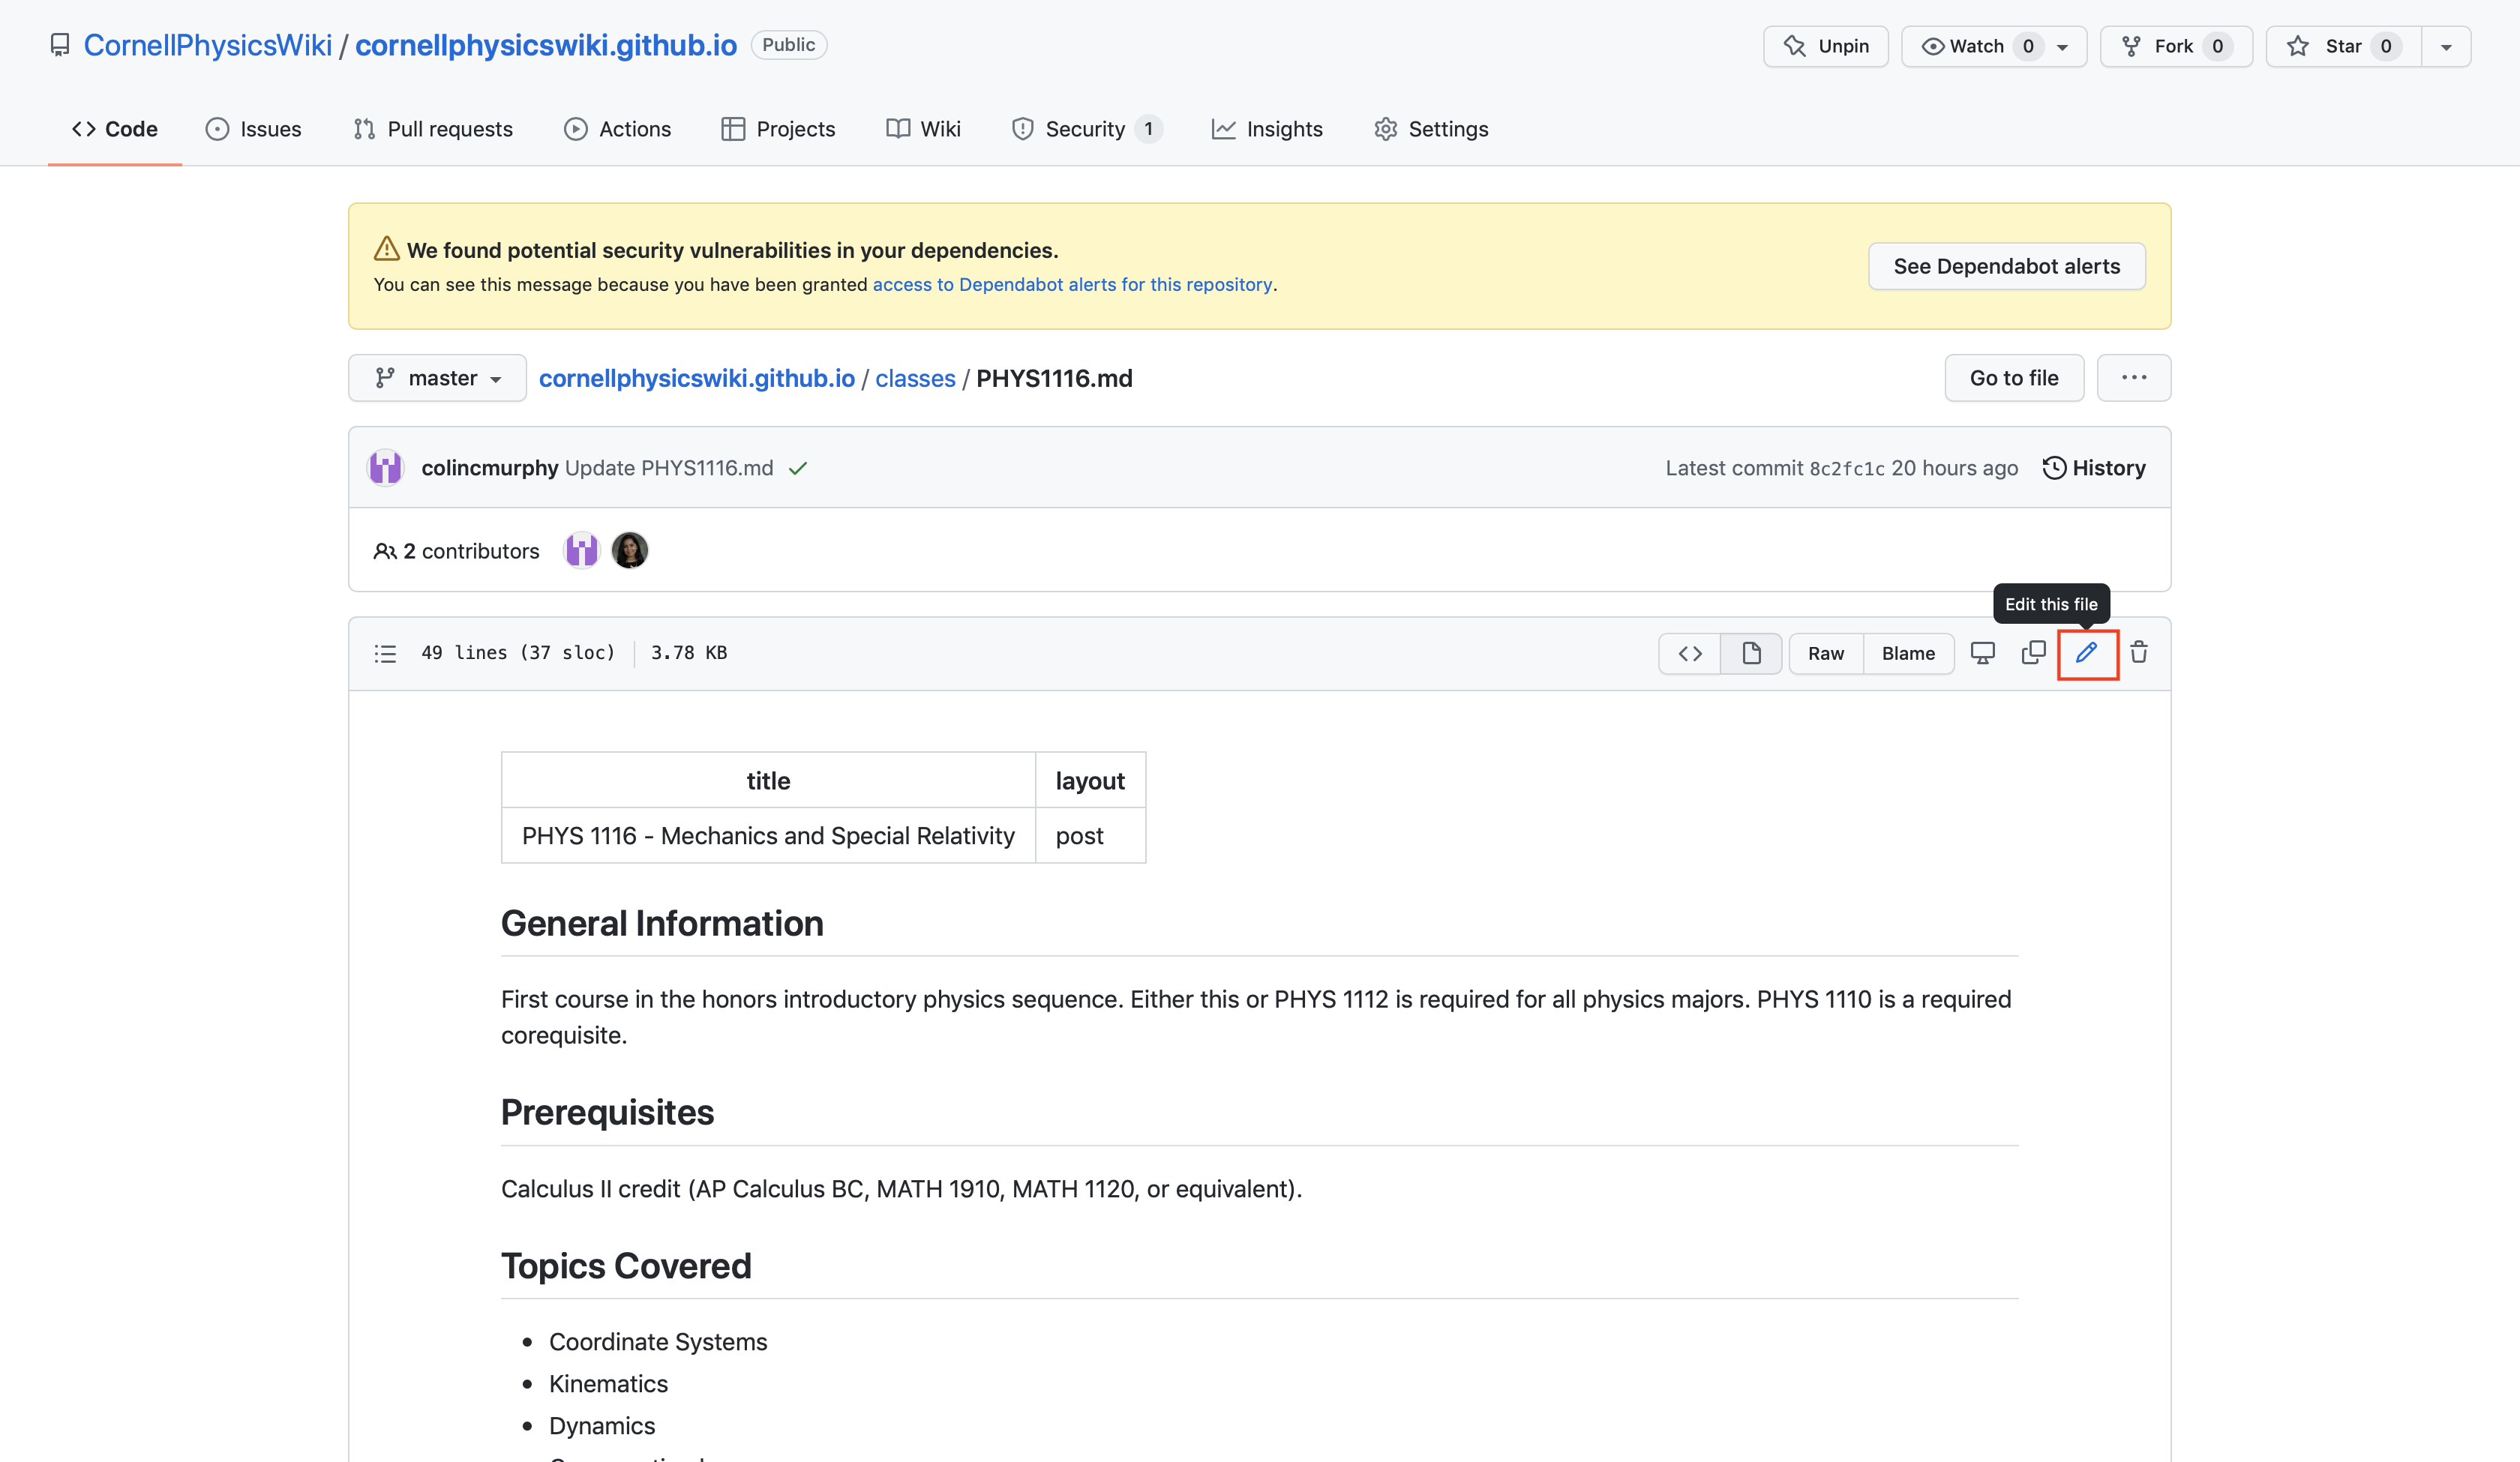
Git can be a bit intimidating to learn for complete beginners. We do explain how to edit the website with git below. An advantage of this is that you can render your changes locally before submitting a pull request. However, it is also very easy to edit the website source code using GitHub Desktop. Just visit our repository and find the page you want to edit. Then hit the edit button! As an example, we will edit the PHYS 1116 class page. Towards the top of the picture below, cornellphysicswiki.github.io/classes/PHYS1116.md shows the directory of the file we are editing. We click the pencil icon (in the red box) to edit the page.
After you click the pencil icon, you should see the the Markdown source code for the website. Markdown is a simple tool for adding formatting to plain text documents. A quick guide to the syntax can be found here. It is intended to be simple to use and easy to read.
There’s also some Markdown formatting specific to the software we’re using for this wiki, Jekyll. In particular, you might notice a section like this at the top of every page:
---
title: PHYS 1116 - Mechanics and Special Relativity
layout: post
---
This is just metadata that tells Jekyll what page template to use and what the page title is. You may also see:
<link rel="stylesheet" href="/main.css">
This links a CSS file that helps format the website. You should not edit or delete either of these parts above. Feel free to add/edit any content below these.
Uploading Files
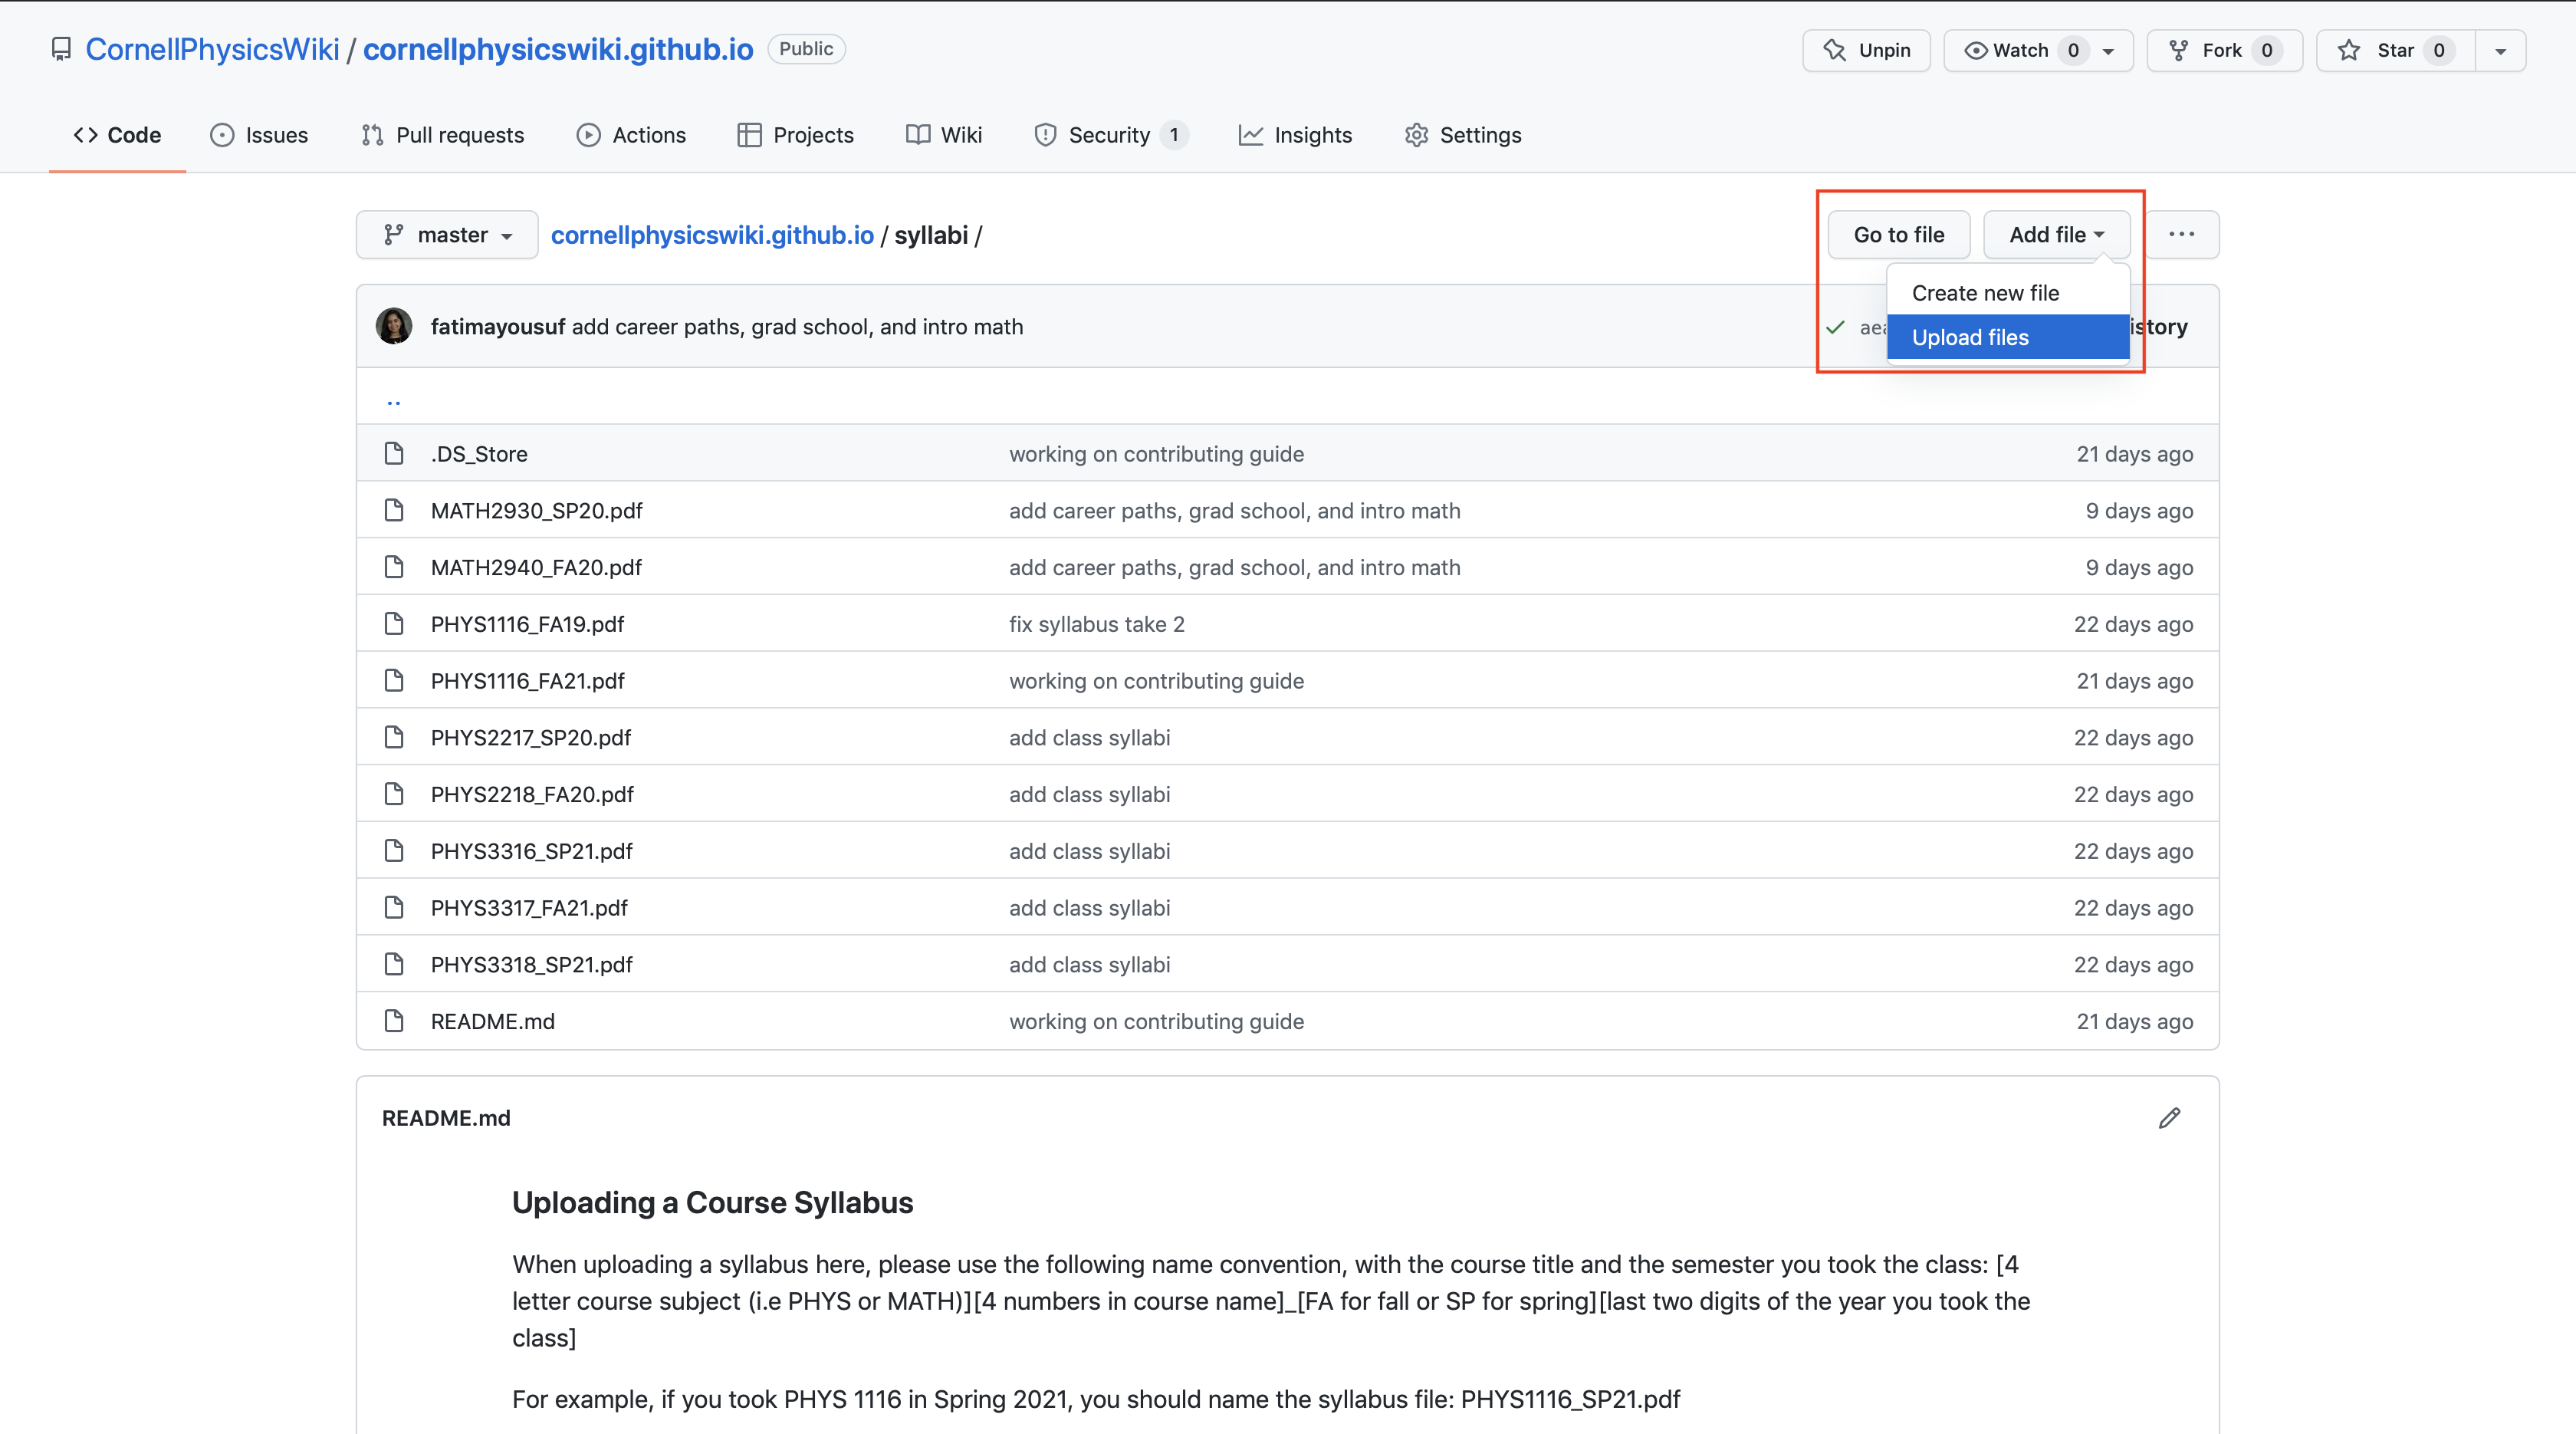
If you want to add a new file, such as a class syllabus, navigate to the relevant folder. Towards the top right of the page, there is a box that says Add file with a dropdown menu. Click on Upload files.
You should then be redirected to a new page where you can upload your file. Please be sure to look for and read the README.md files for further instructions on how to name files. Follow the instructions below for committing your uploaded files and edits to the website source code.
Adding New Course Pages
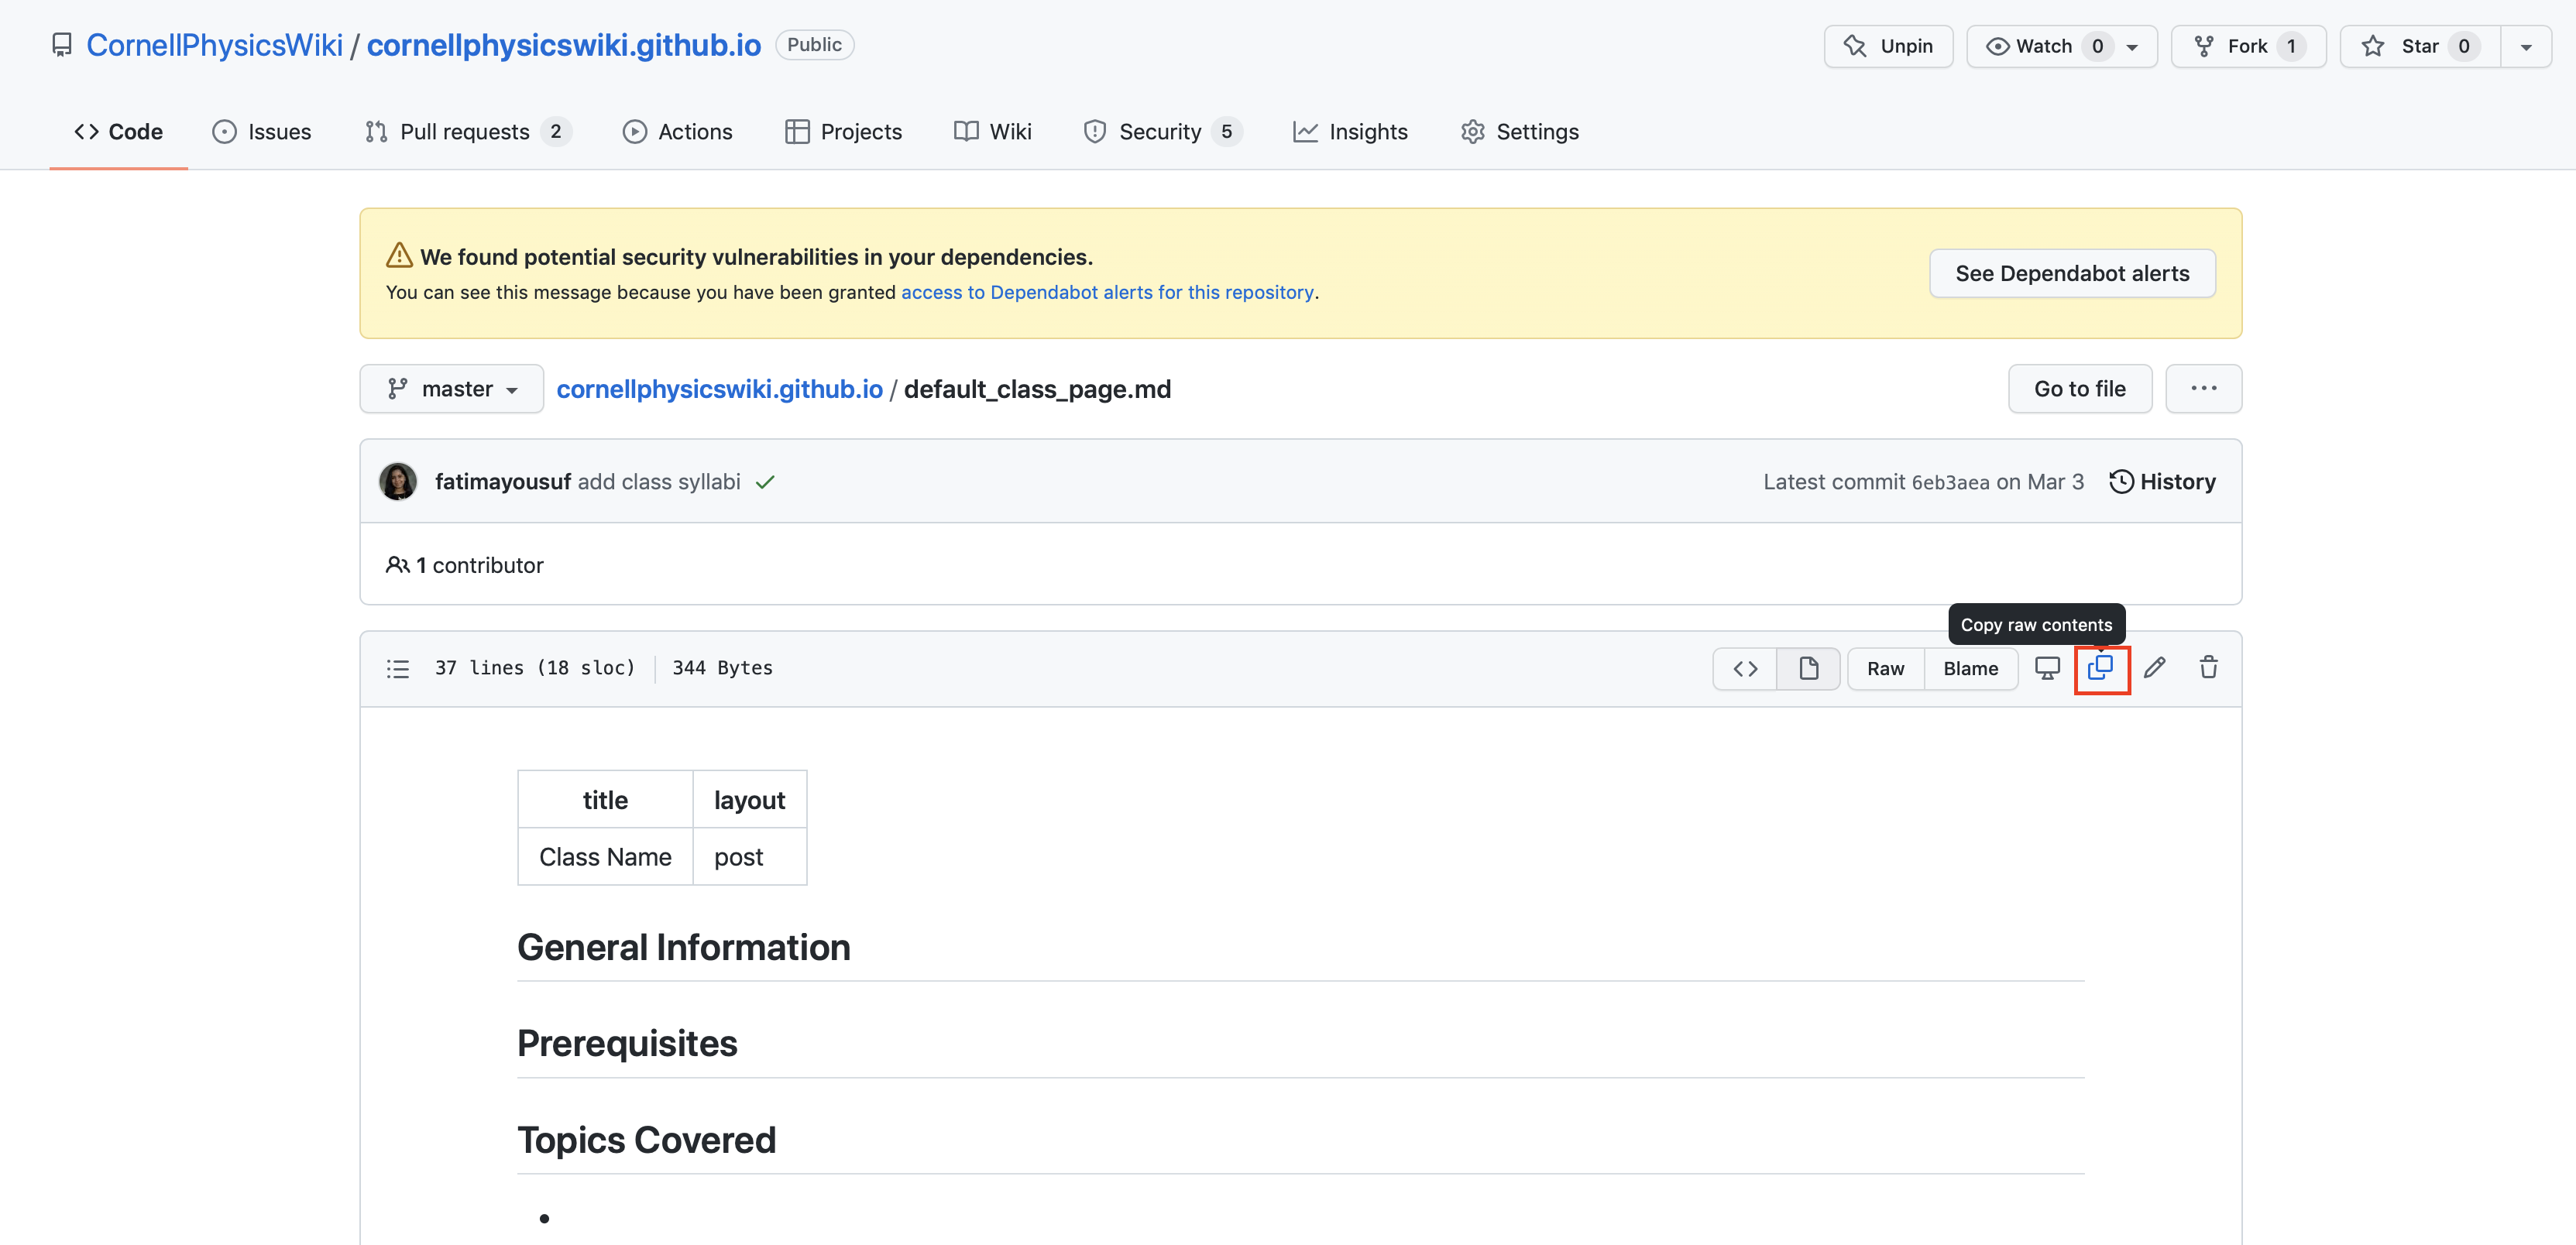
If you notice that a physics or physics-related class is missing from this wiki, we would appreciate you adding a new course page and adding some information! To do this, first go to the code for this default class page and click “Copy raw contents”.
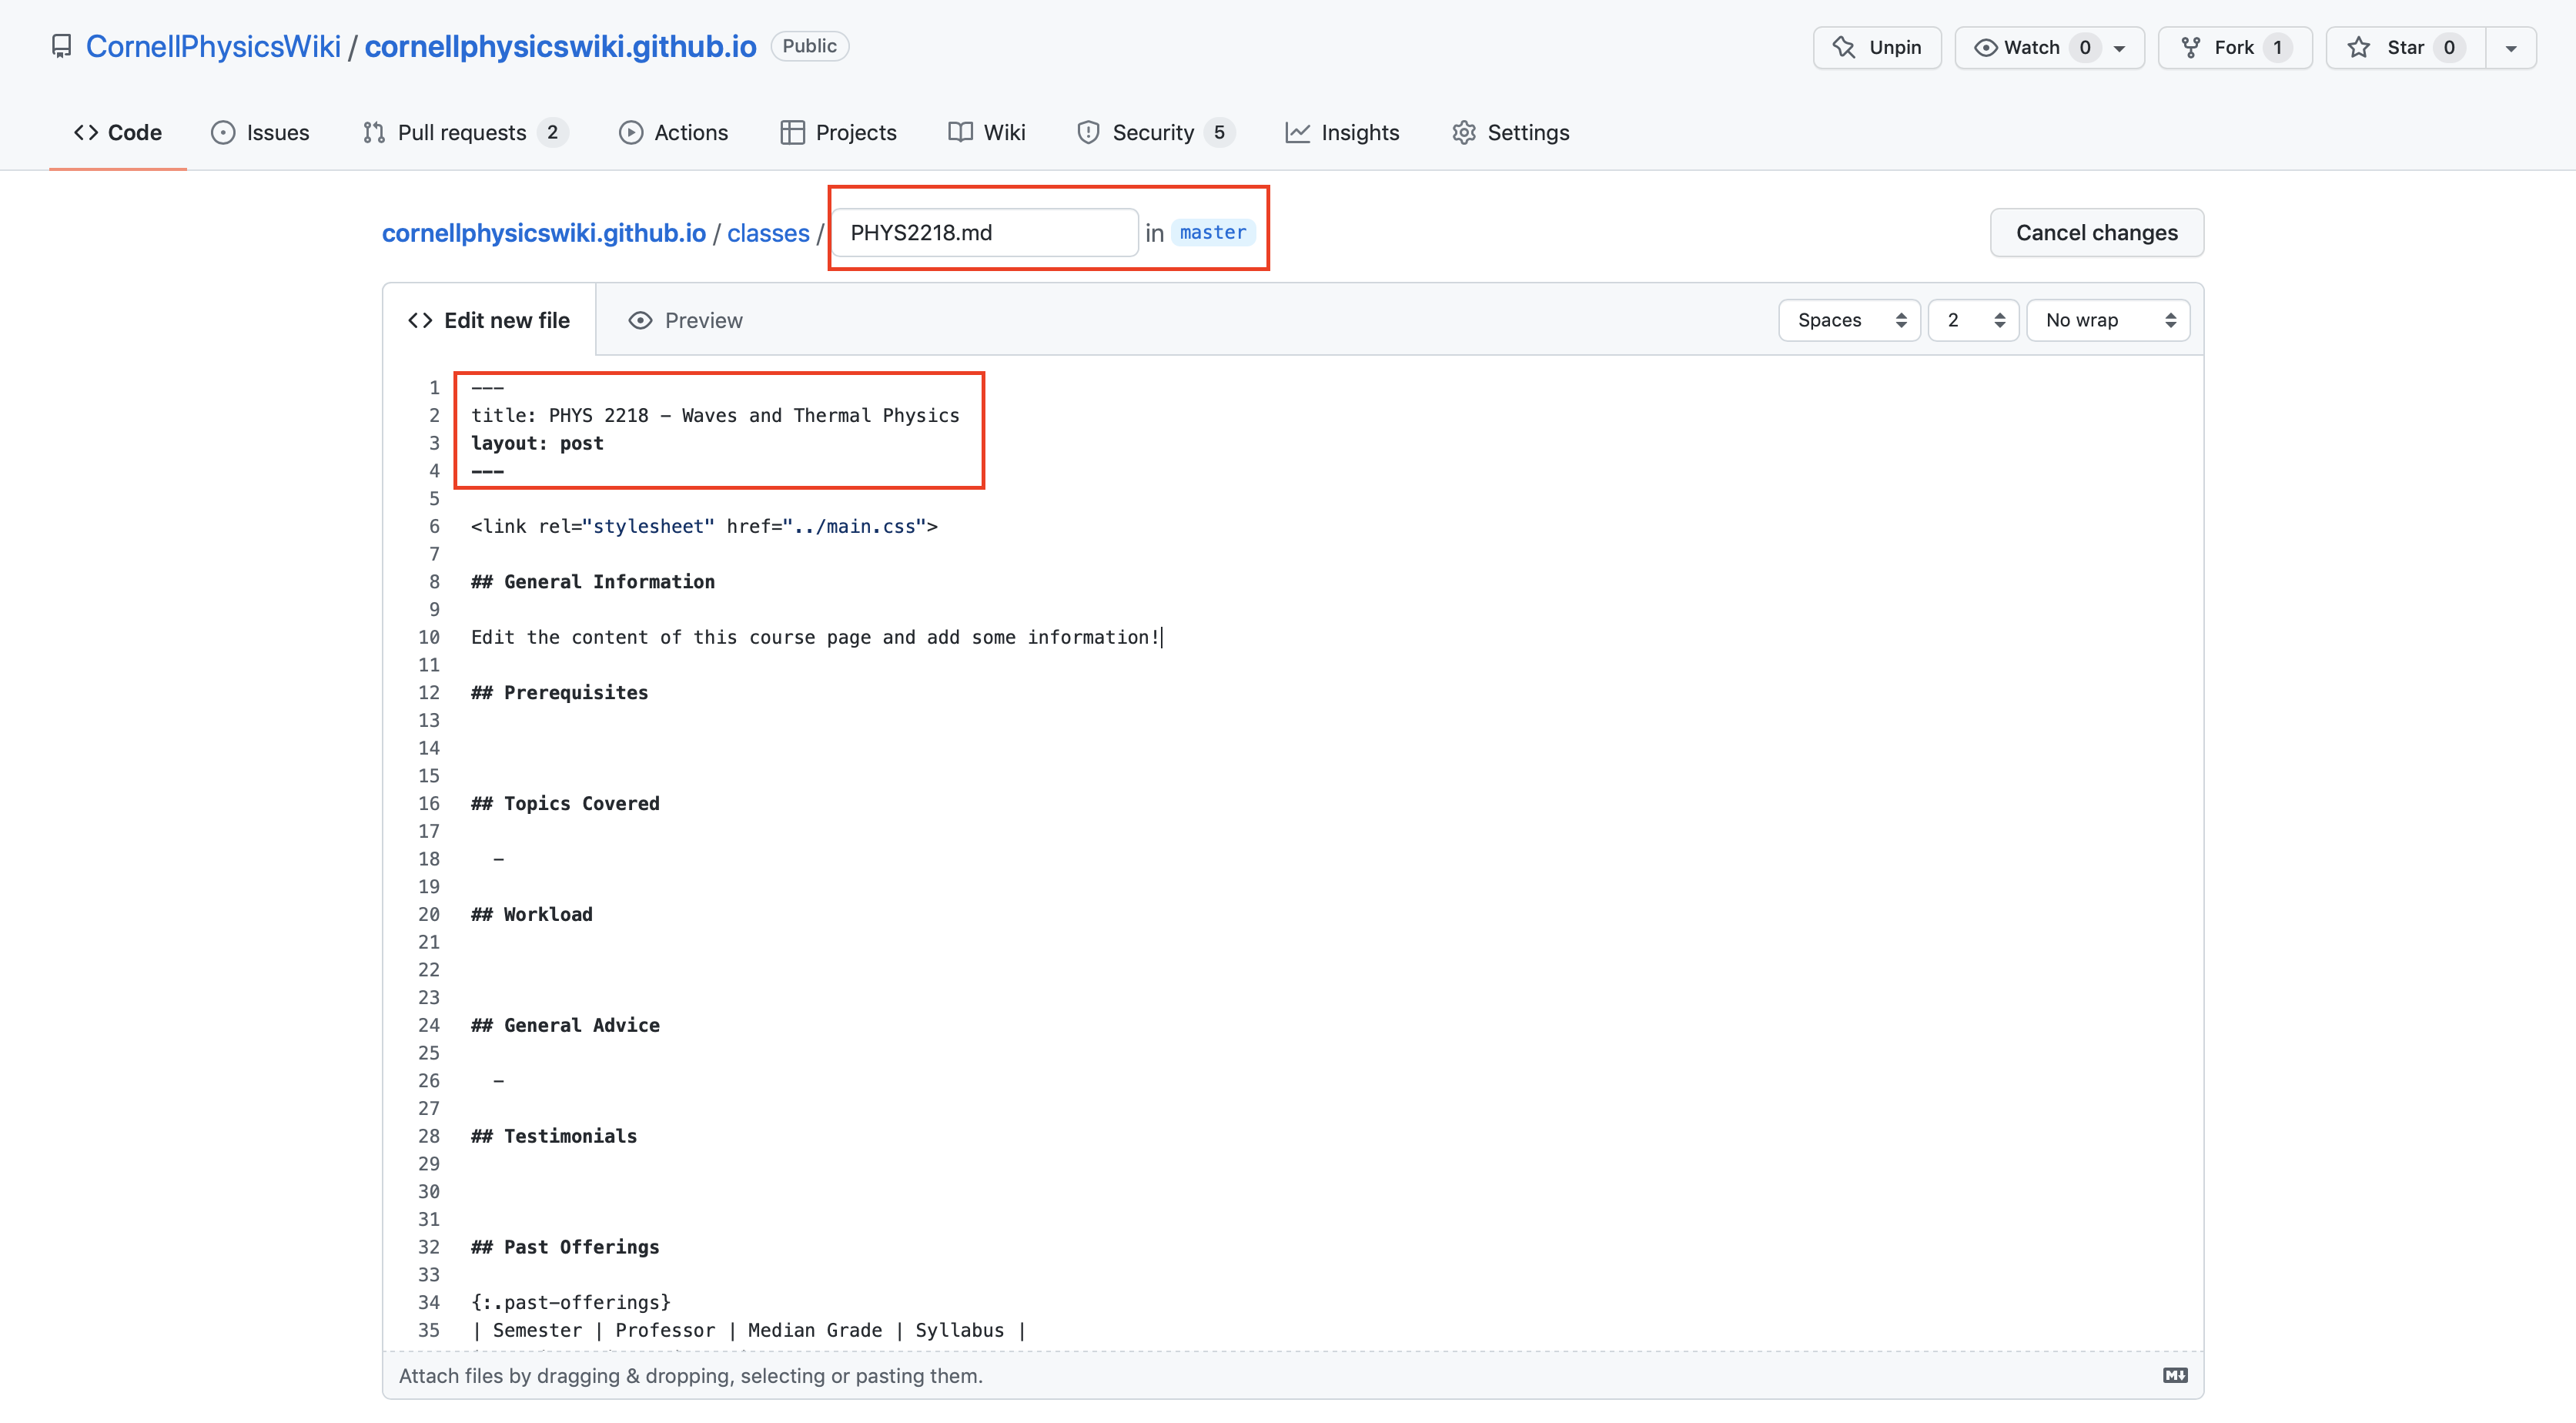
Navigate to the classes folder on the GitHub repository. In the top right, click “Add file” and “Create new file”. You should be redirected to a new page, where you can paste the raw contents of the default class page. Set the name of the file to be: [Four letters of course name][Four numbers of course name].md, for example, PHYS2218.md. Edit the content of the page and add information. Don’t forget to change the “Class Name” in:
---
title: Class Name
layout: post
---
Follow the instructions below for creating a pull request to add this class file to the website.
Once you have made the pull request, go back to the home page of the wiki. Edit the homepage and add a link to the class page you just created in the appropriate section by typing:
- [COURSE NAME](/classes/[name of the course page file you just made].html)
Create another pull request for this edit to the homepage.
3. Submit a pull request
Now let’s suppose I have added some general information to the PHYS 1116 page and I want to submit these changes. The way to do this is to create a pull request. Scroll to the bottom of the page you have edited. There should be a box that says Commit Changes. Below that, select the option Create a new branch for this commit and start a pull request. A new text box should appear that allows you to name your new branch. Don’t worry too much about how branches and version control in GitHub work for now. Write a short name for your branch that relates to the changes you have made.
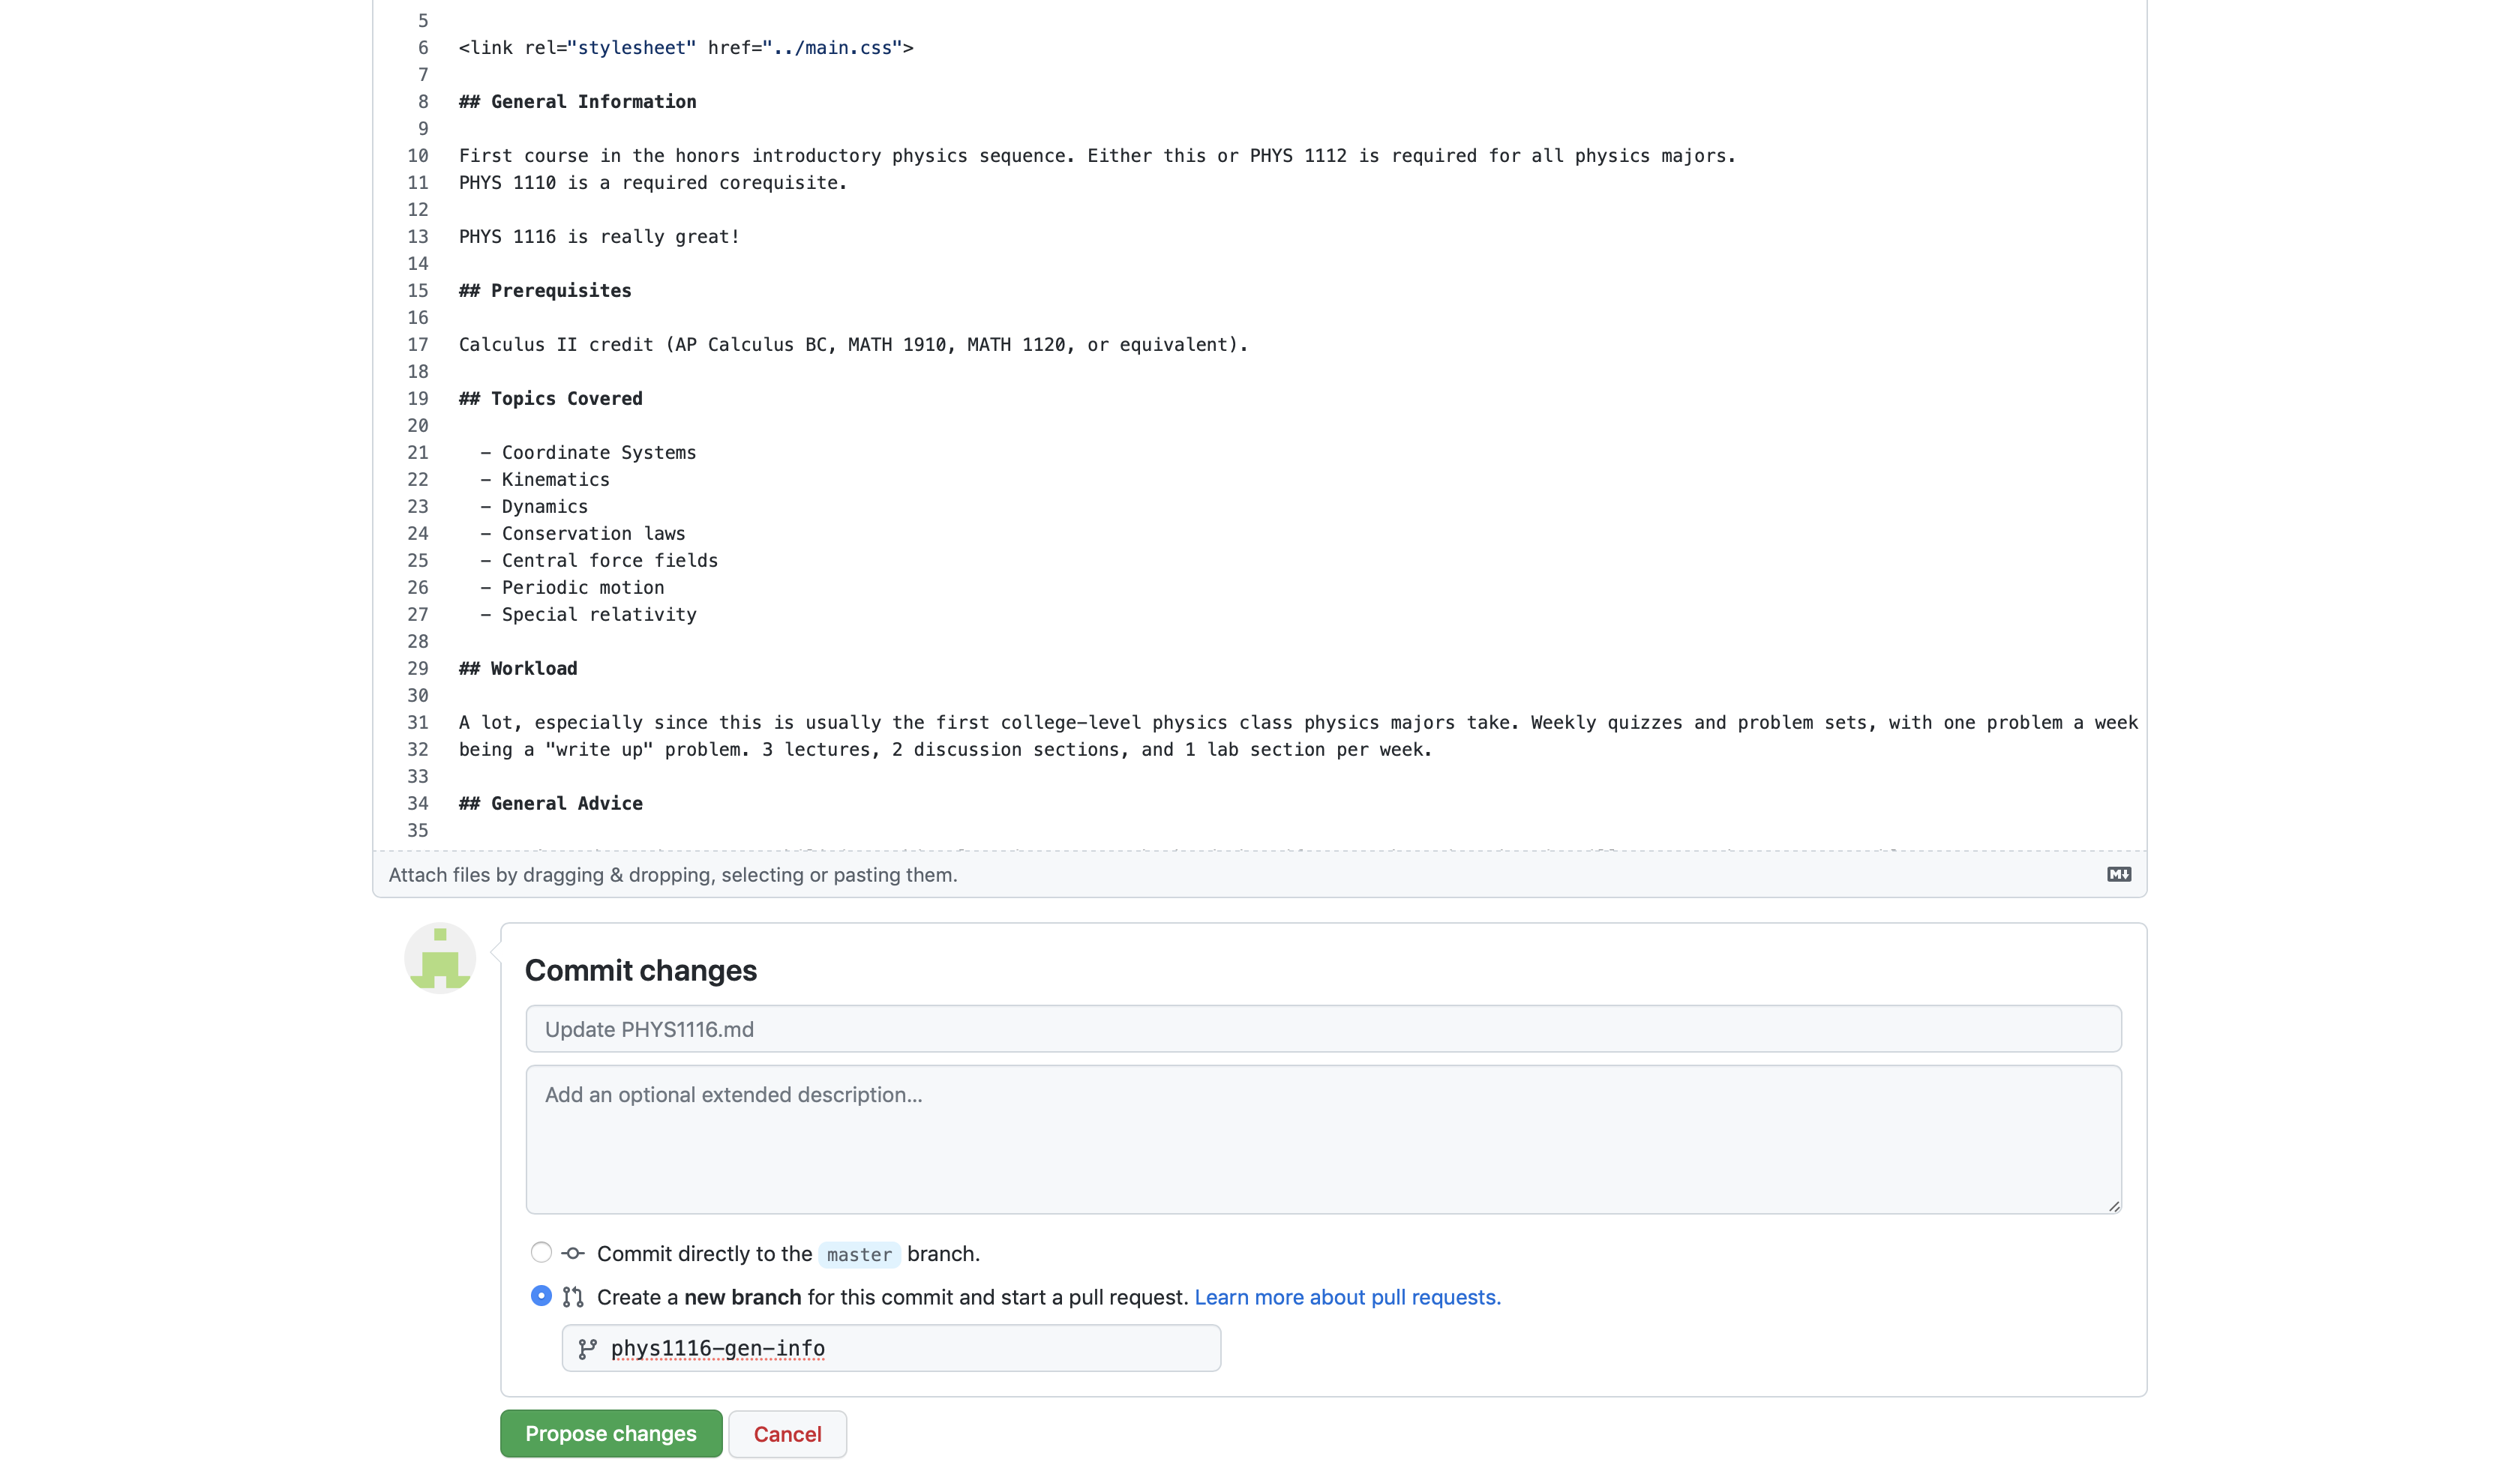
Click Propose Changes. After that, you should be redirected to a new page like the one below:
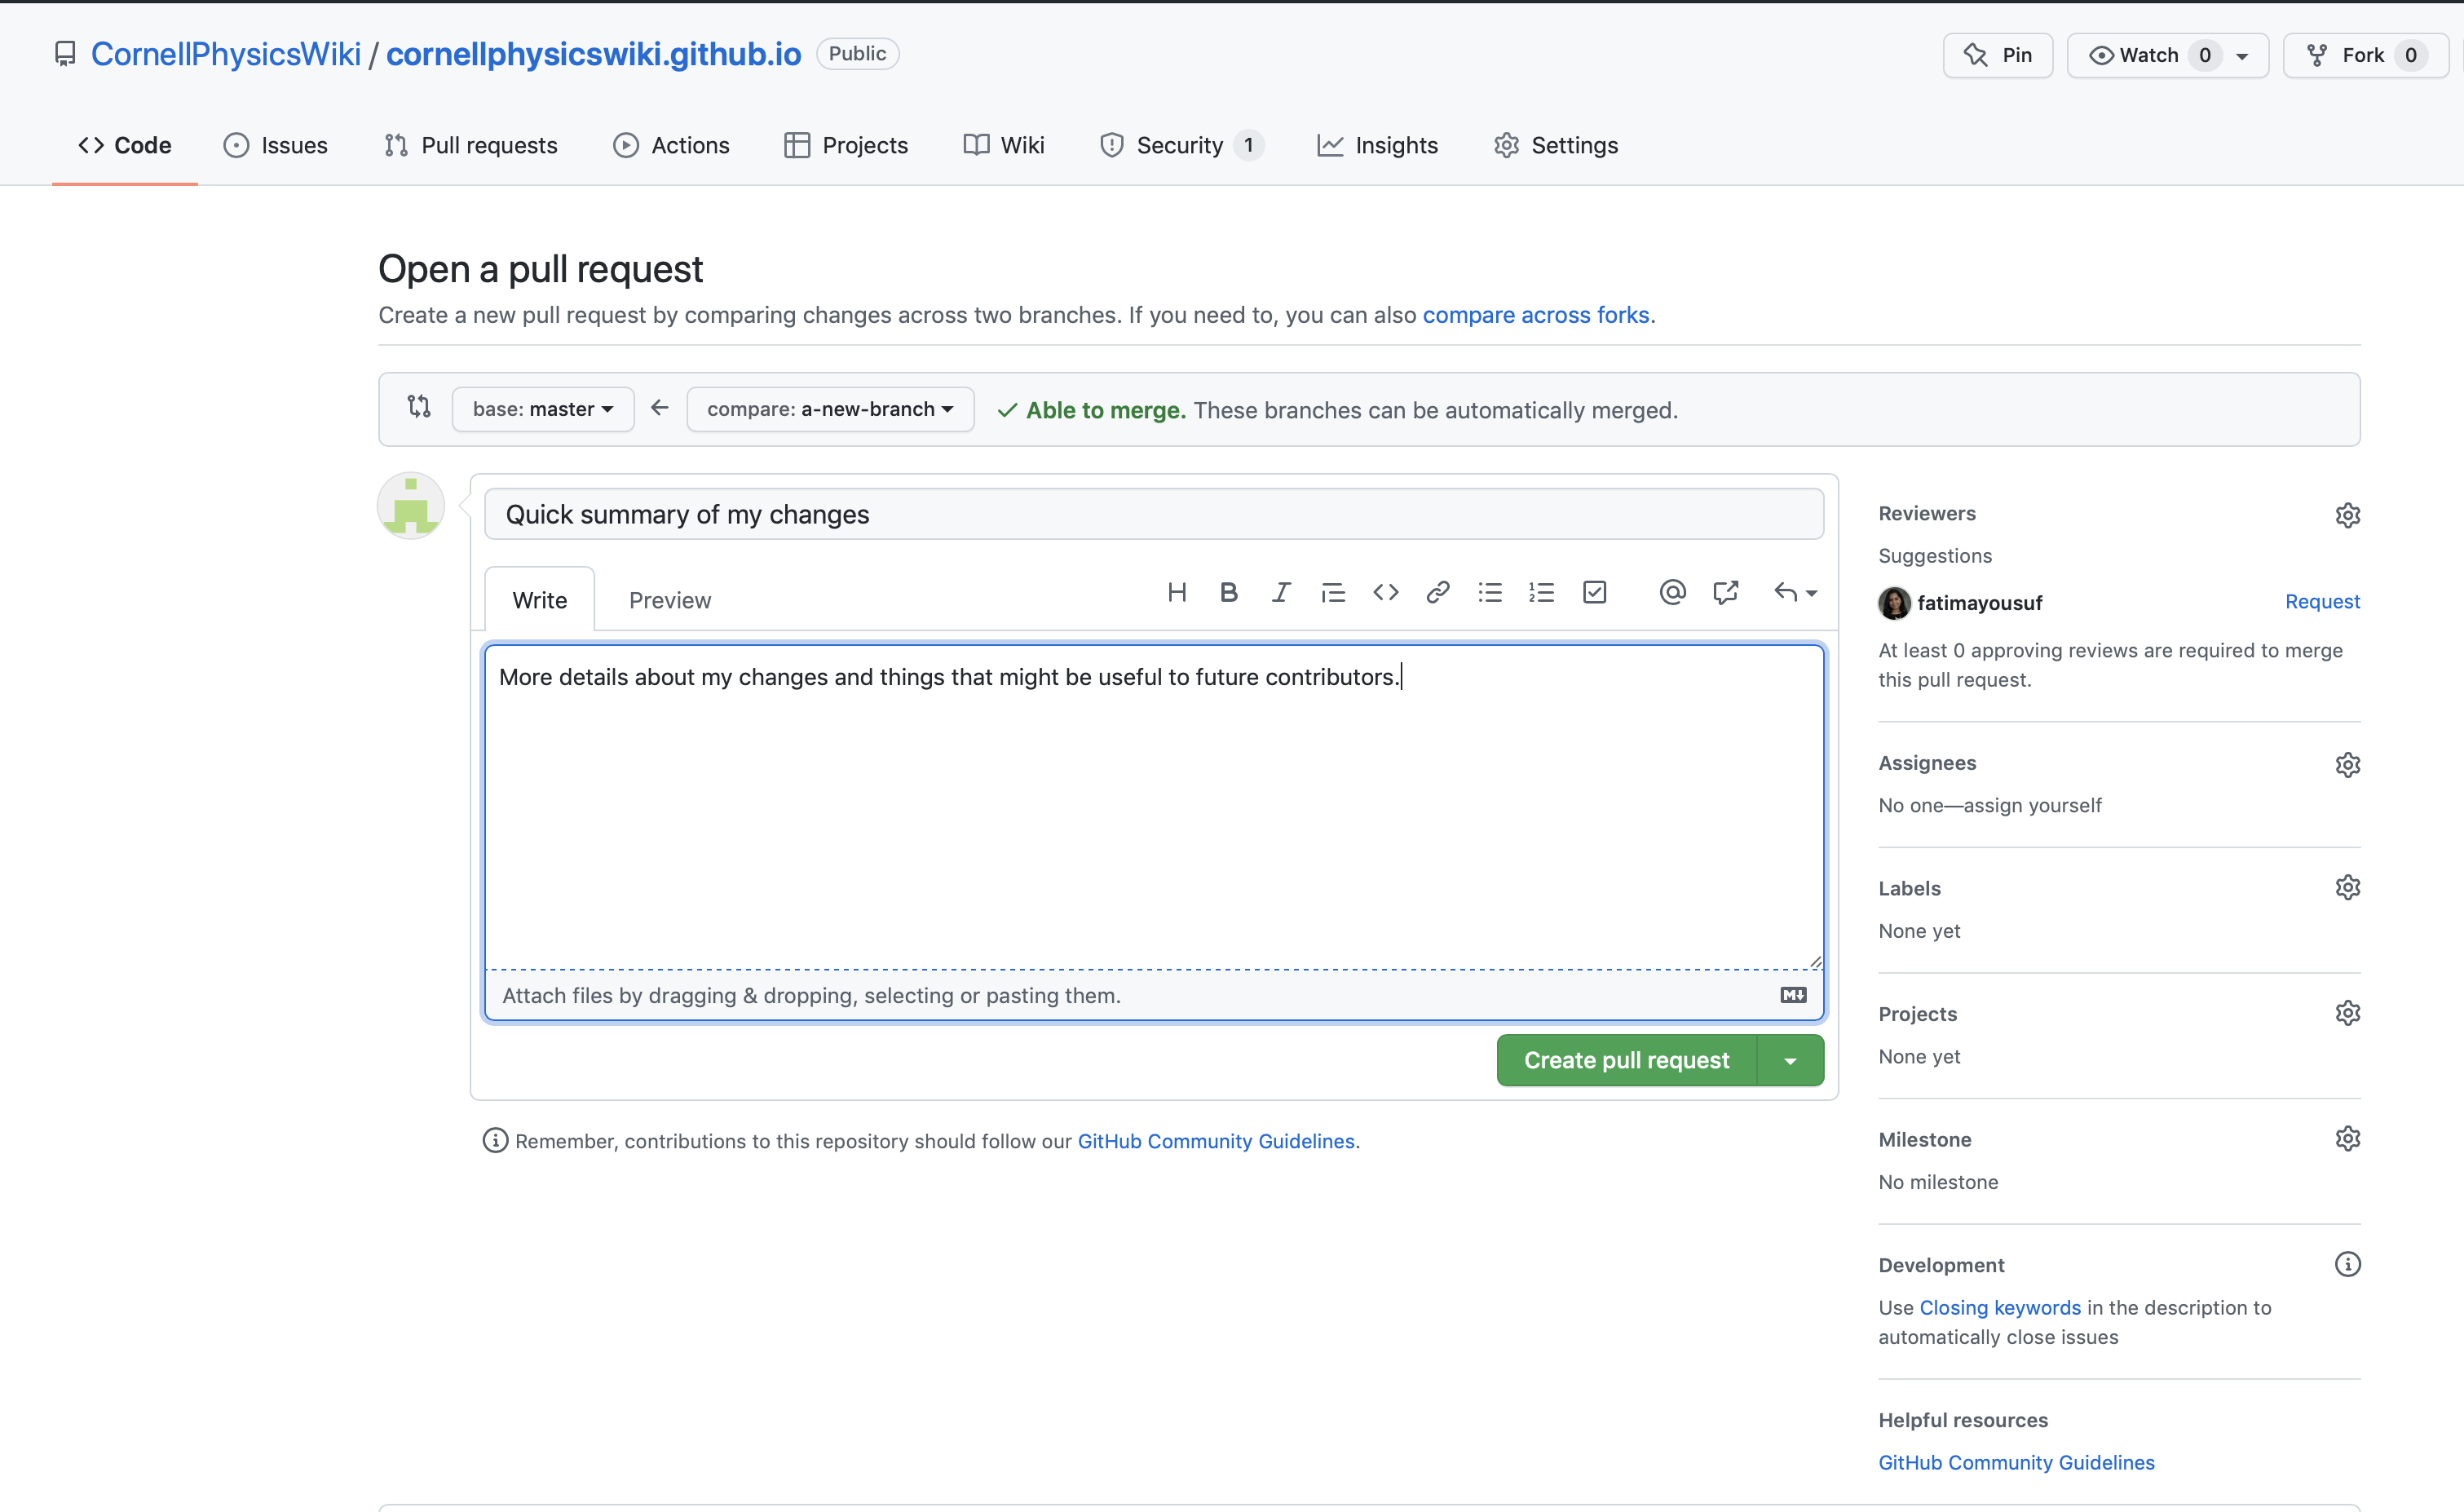
Enter some comments about your changes so that the website administrators/reviewer knows what changes you made. On the right, you will need to add at least one reviewer. This reviewer must be a website administrator and can be any of the people below:
- Fatima Yousuf (fatimayousuf)
- Colin Murphy (colincmurphy)
- Ved Sriraman (sriramanved)
- Ariel Marxena (arixena24)
- Stella Dang (stelladang)
- Devisree Tallapaneni (devisreet)
Click “Create Pull Request”. You’re reviewer might suggest some edits to your changes. Once your changes are approved, the website will be updated. Most of the time, as soon as we get around to reviewing your changes, we’ll just accept them.
Congratulations, you’re a contributor! If you’ve never done this before, then even better—you’ve just made your first contribution to open source.
If you want to add yourself to the contributors list, feel free to edit the file contributors.md and add your name.
Edit the Website Code with Git
You can edit the website directly following these steps:
- Create a GitHub account
- Clone the repository on your local computer
- Create a new branch off of master
- Make your changes
- Submit a pull request
1. Create a GitHub account
Go to GitHub and sign up. You’ll need to confirm your email address before you can do anything else.
2. Clone the repository on your local computer
There are two ways to make changes: you can either make a local copy of the codebase on your computer and edit it, or you can edit the code on the Desktop version of GitHub. Here, we will discuss the first method. This method especially useful since it allows you to run your changes locally and test that everything works before attempting to push your changes to the public website.
On your computer, open a terminal and go to the folder where you want to store the website files using cd commands.
Go the website Github repository. Click the “Code” button at the top right. There
should be a small pop-up window that says “Clone” and a URL, as shown below. Copy this URL and go back to your terminal. Enter git clone [URL].
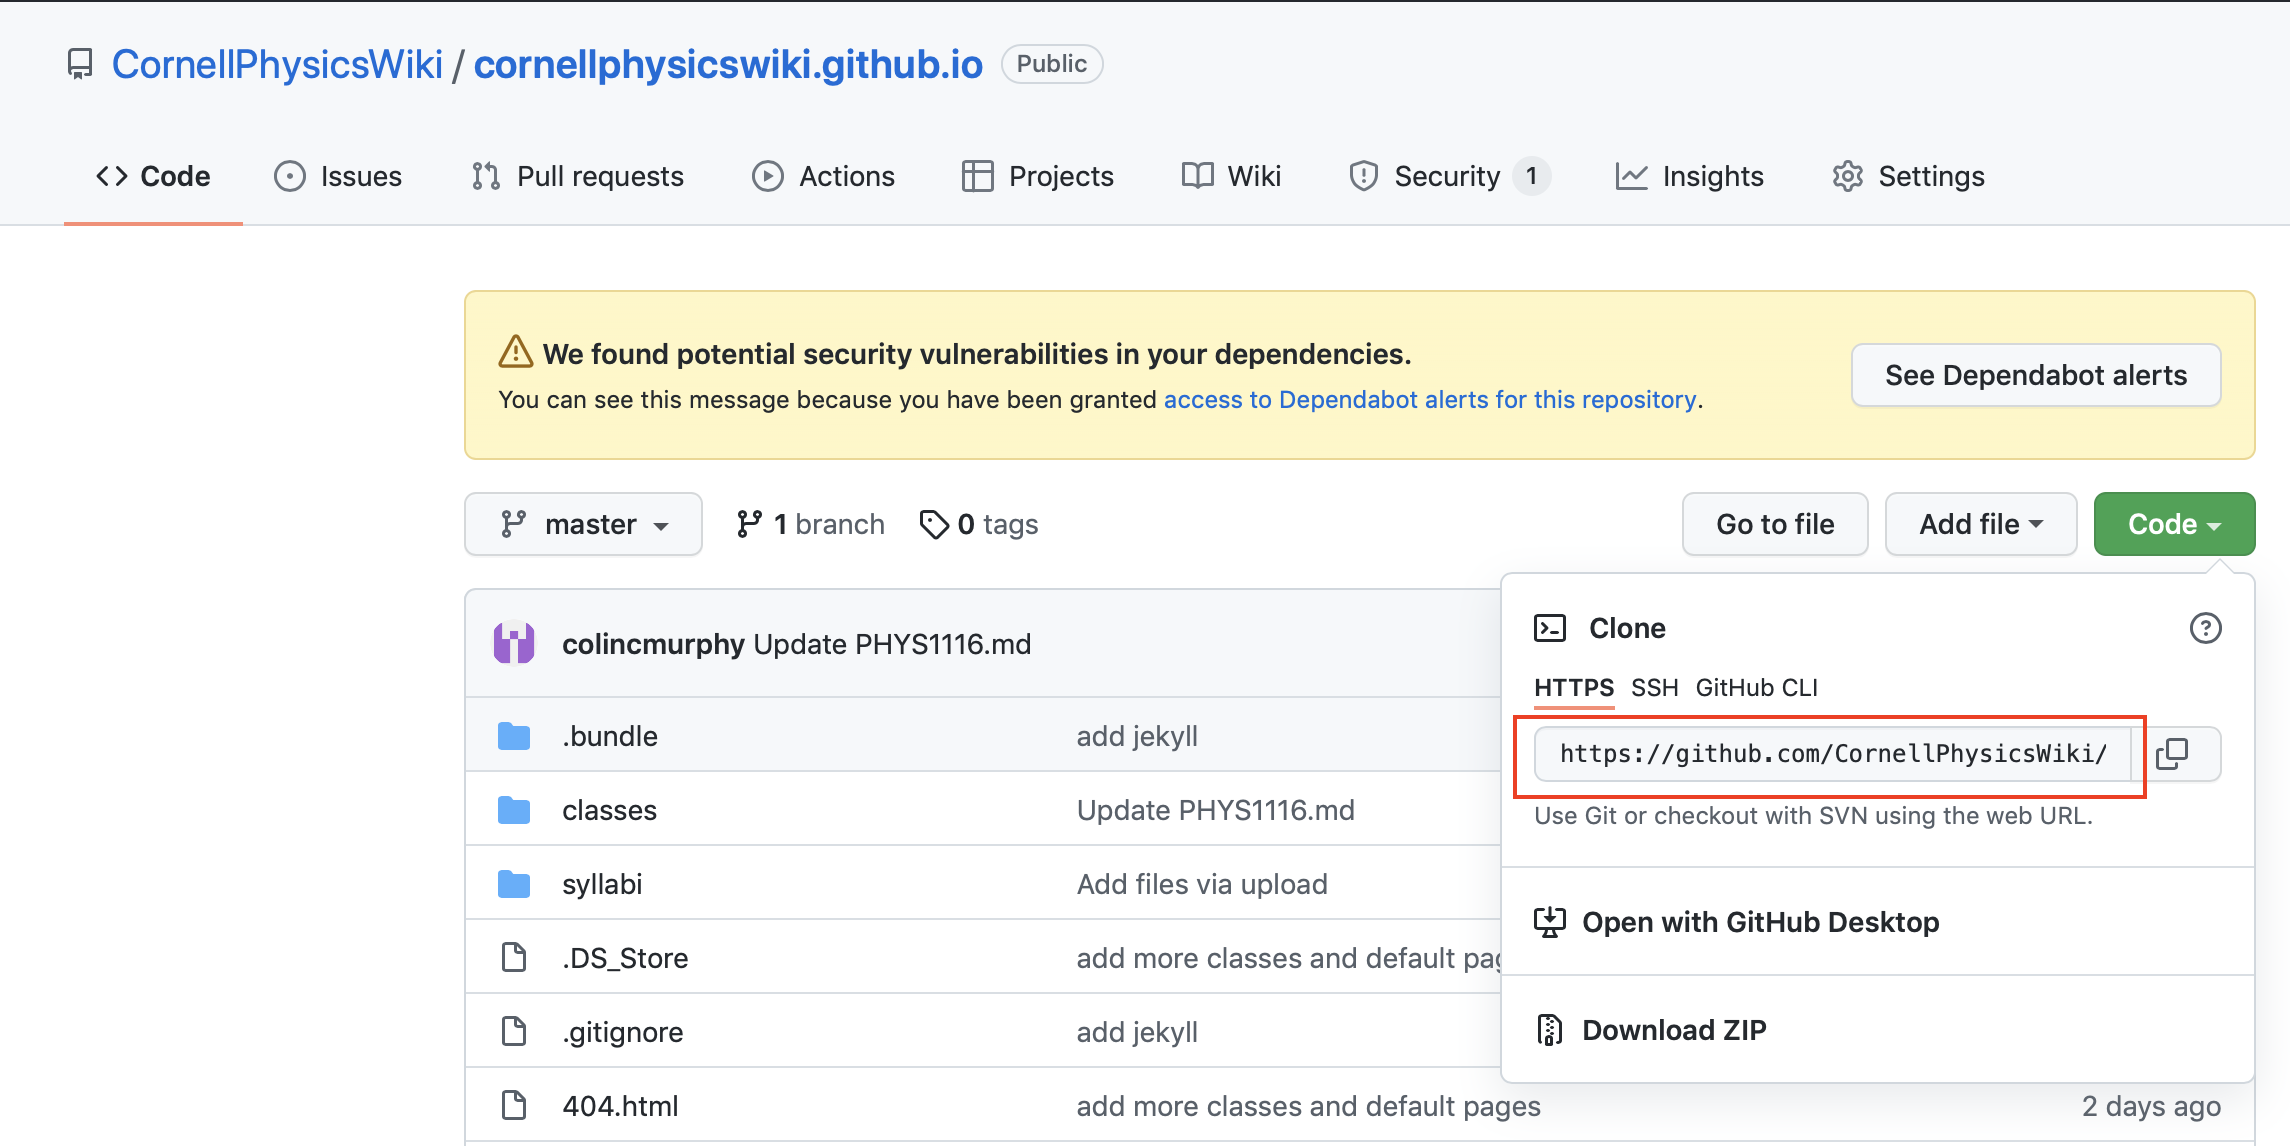
Now a copy of all the website files should be downloaded onto your computer!
3. Create a new branch off of master
The files for the public-facing website are all on a branch called master. Only the website administrators can directly edit the website on the master branch.
If you are not an administrator, then you will have to make your changes on a separate branch and request to merge your changes into master.
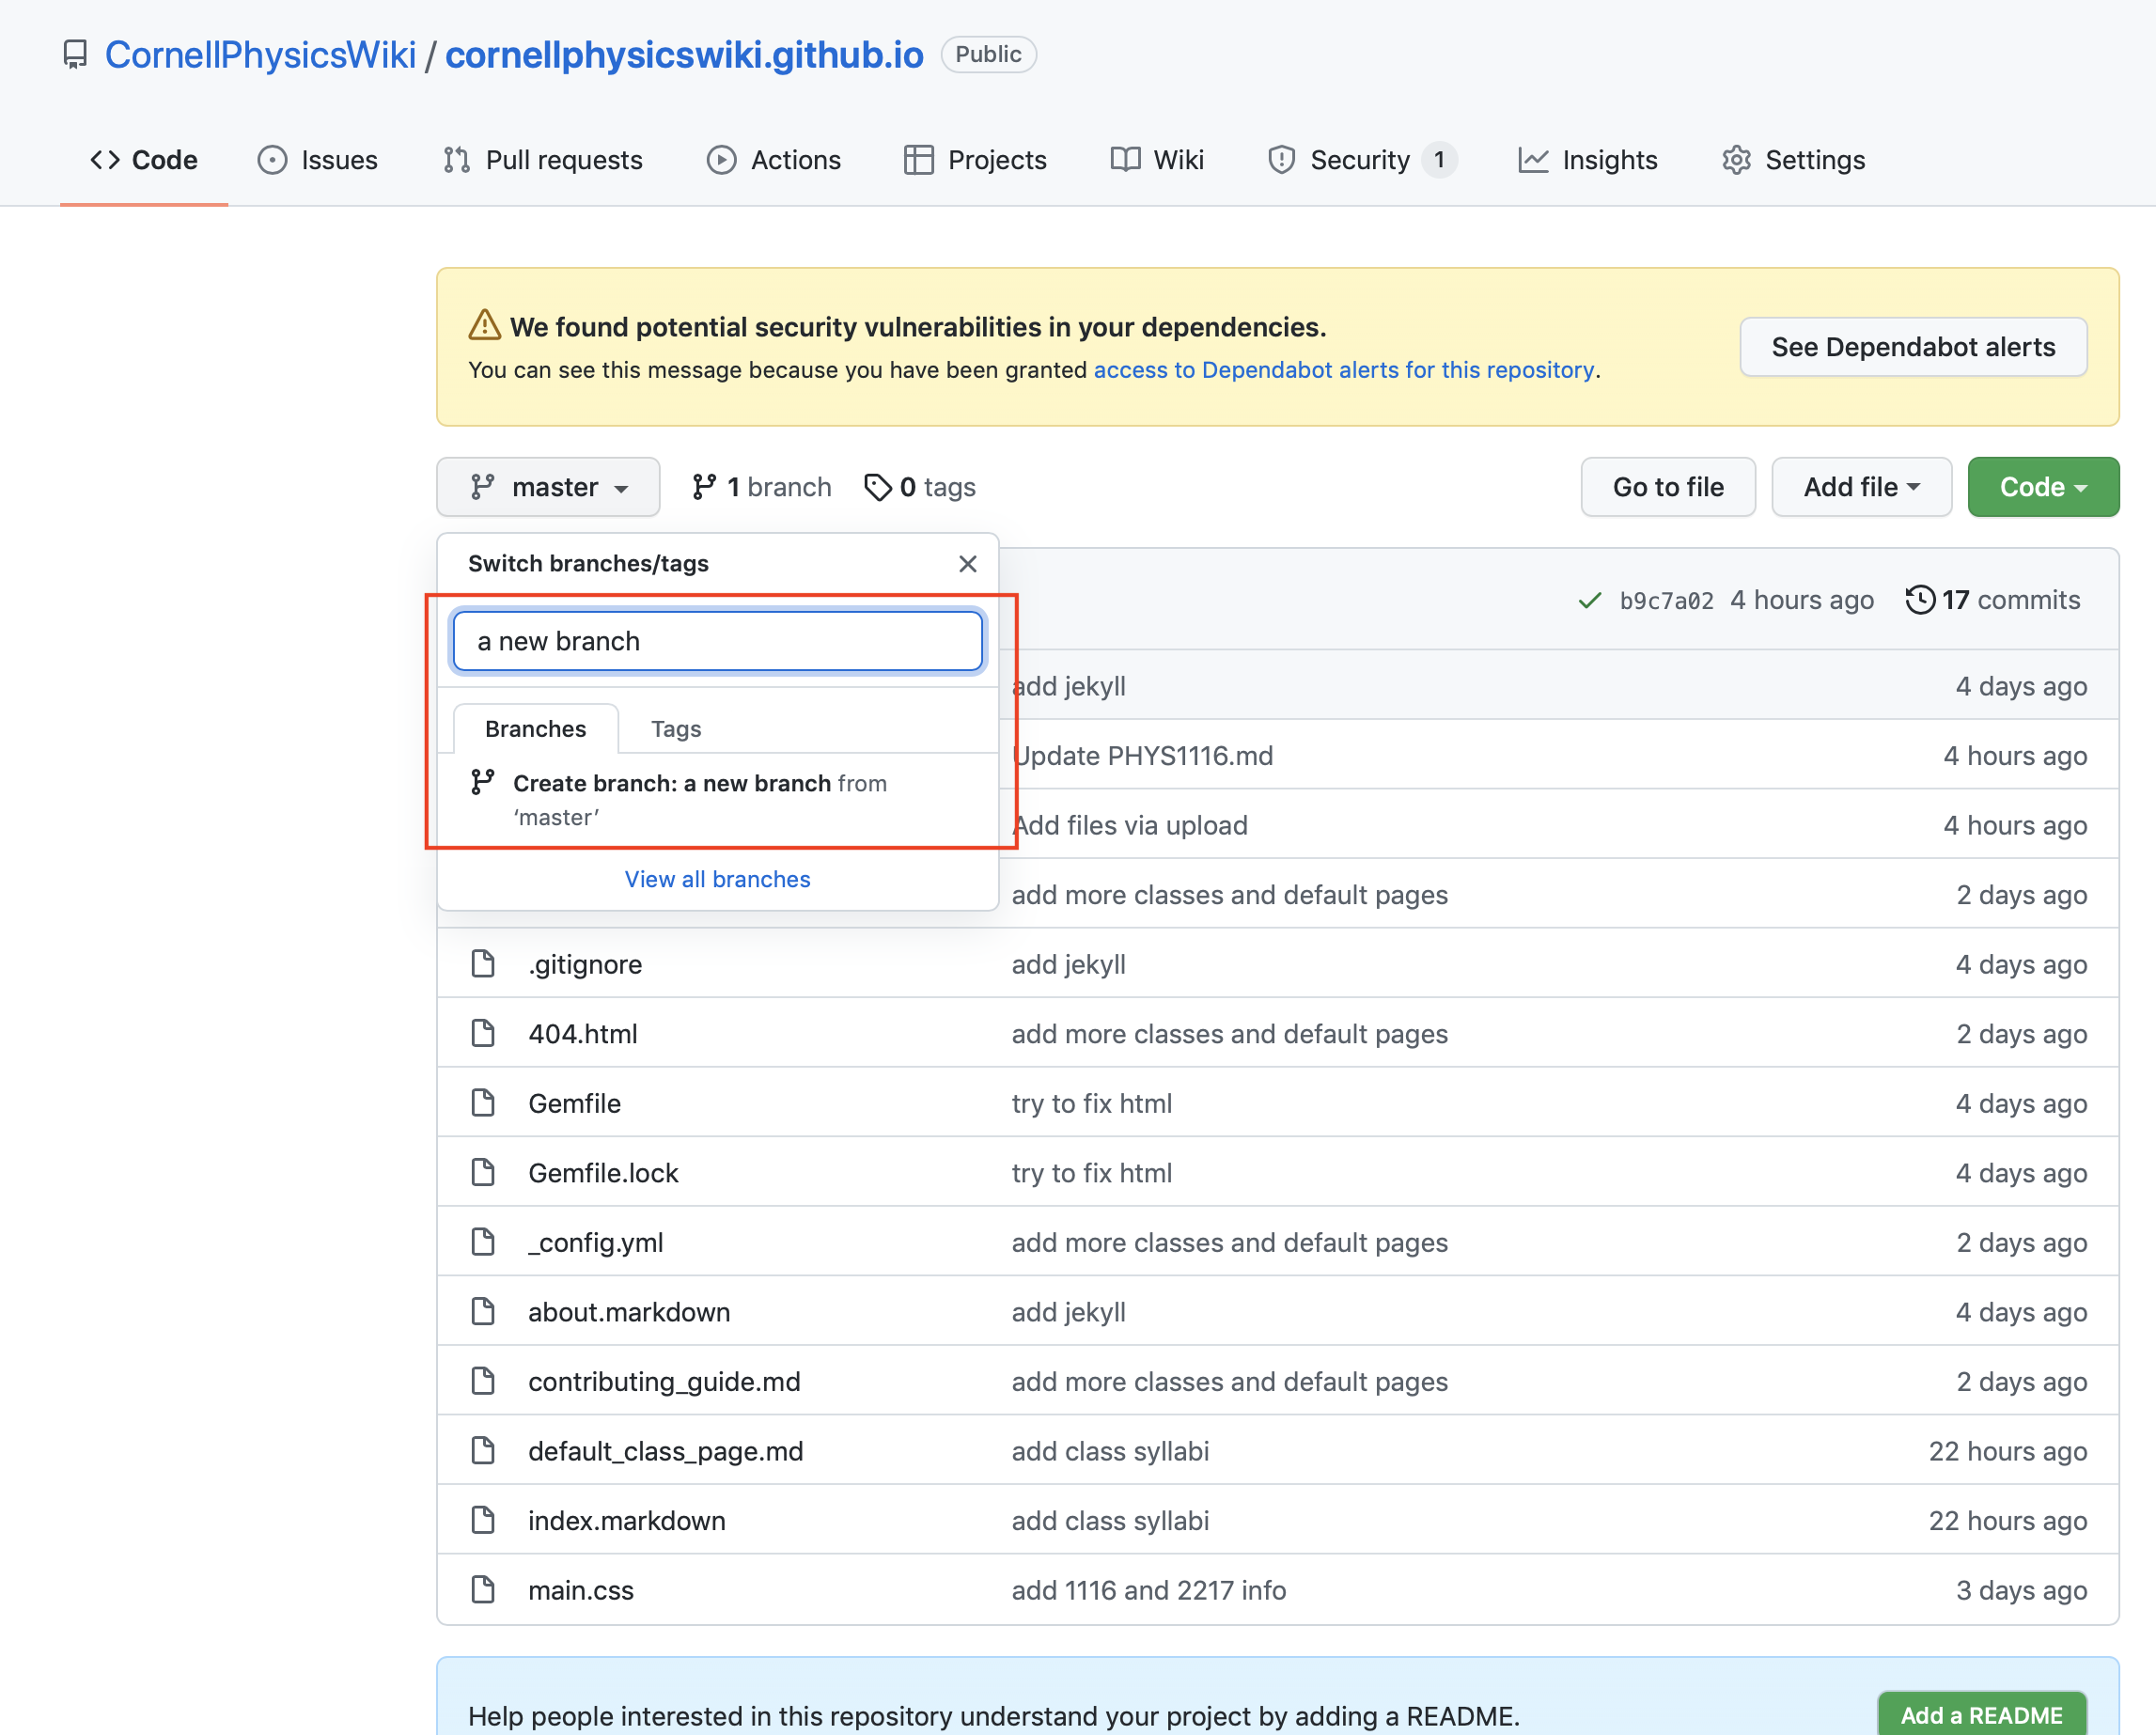
Making a new branch is especially easy on the Desktop version of GitHub. Go back to the website Github repository. On the top left, there should be a gray box that says master. Click on this, and in the text box below, type what you want
to name your new branch. Make sure that no other existing branch has this name. After that, an option should show up saying Create branch: [your branch] from master. Click on this, and you will have created a branch where you can make all your changes!
Now you will need to switch to your new branch on your local computer, so that all your changes will be stored there instead of master. In your terminal, enter:
git pull
git checkout [your branch]
4. Make your changes
Now that you are pretty much all set up, you can start making your changes! You can use any code editor you like, such as Visual Studio Code. The website pages are written using Markdown. Markdown is a simple tool for adding formatting to plain text documents. A quick guide to the syntax can be found here. It is intended to be simple to use and easy to read.
There’s also some Markdown formatting specific to the software we’re using for this wiki, Jekyll. In particular, you might notice a section like this at the top of every page:
---
title: PHYS 1116 - Mechanics and Special Relativity
layout: post
---
This is just metadata that tells Jekyll what page template to use and what the page title is.
After you make your changes, you may want to run the website locally to see if everything works. The website is built with a software called Jekyll, so if you clone the repository and try to preview, you’ll just get an preview of the markdown. Here’s how to fix this.
- Install Jekyll on your computer.
cd(the command) into the directory where you cloned the github repo.- If jekyll is installed correctly, when you run
jekyll serveorbundle exec jekyll serve, you should see a serving running message. - Navigate to the server address in your browser (normally “127.0.0.1:4000”). You should see the page rendered.
5. Submit a pull request
You’ve created some amazing new pages and changes, and now you want to add them to the public wiki website! The way GitHub does this is through pull requests, where you merge all the changes on your new branch into master. First, you will need to commit your changes to your branch. In your terminal:
- Go to the folder where all the website files are store using
cdcommands - Check that all the files you edited have been saved
- Enter
git add -A - Enter
git commit -m [summary of your changes in a few words] - Enter
git push
Go to the pull requests section of the code repository and click “New Pull Request”
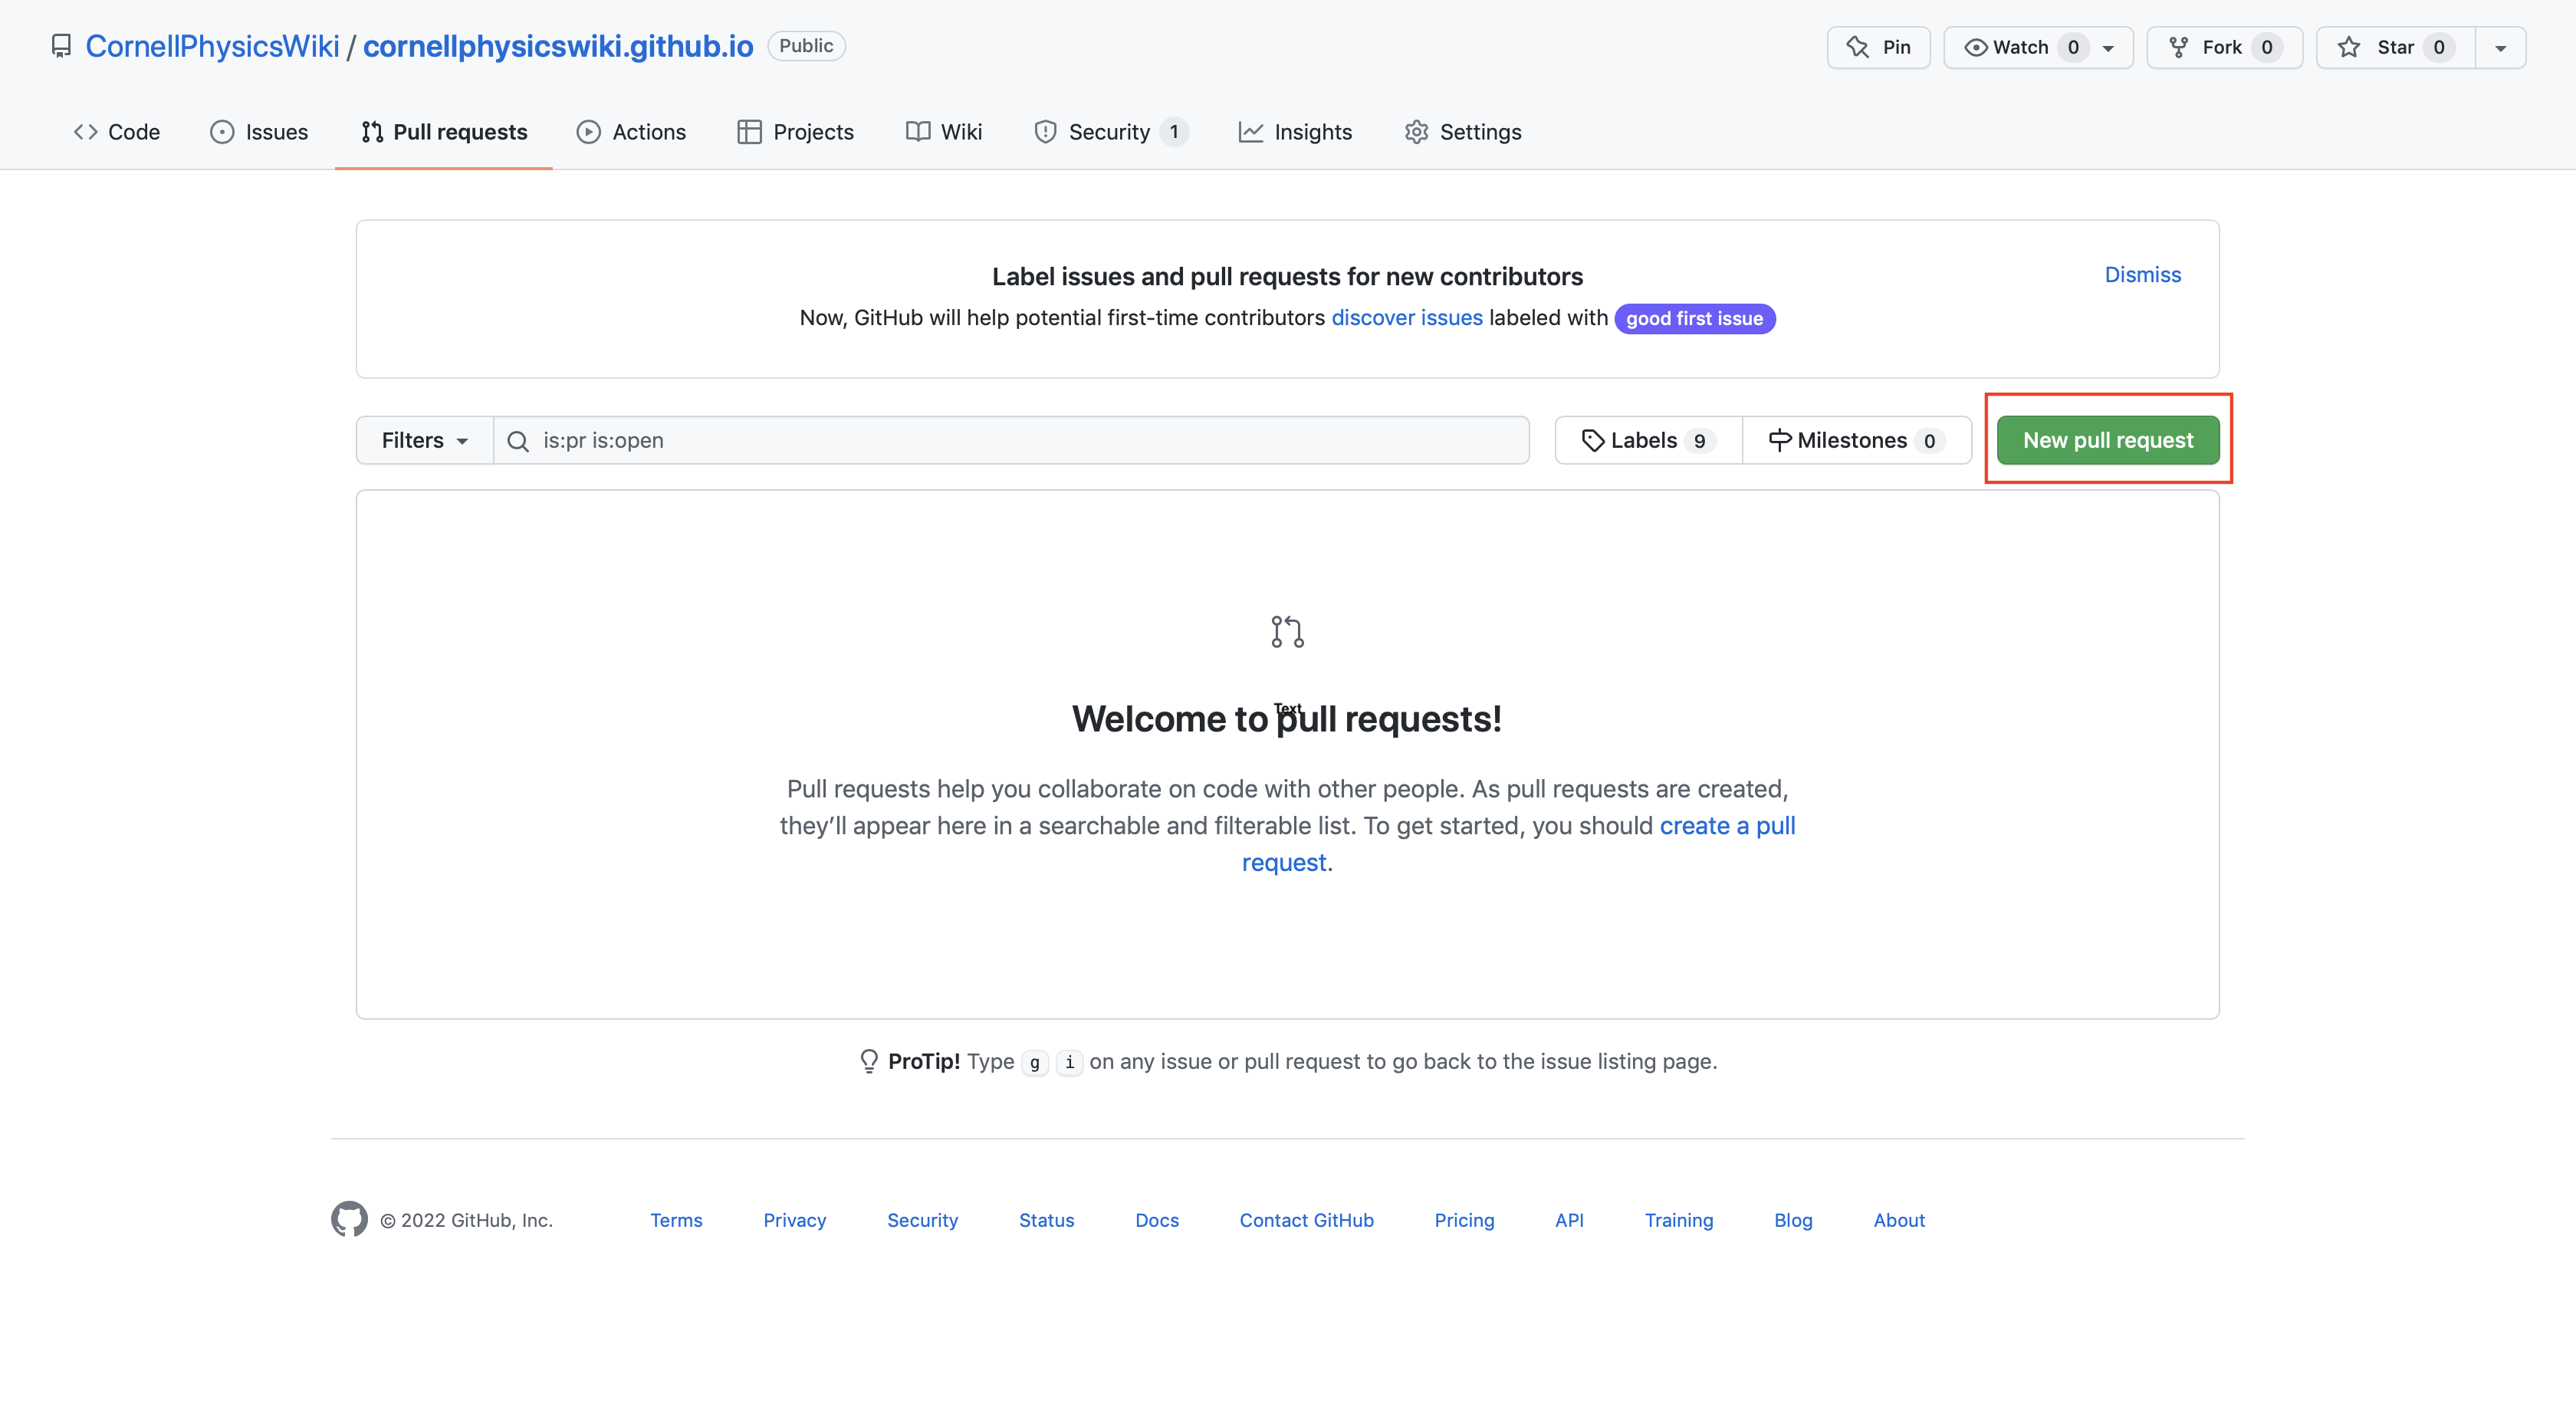
There should be a gray box that says “Compare: [your branch]”. If it doesn’t say your branch name, then make sure to change it before making your pull request.
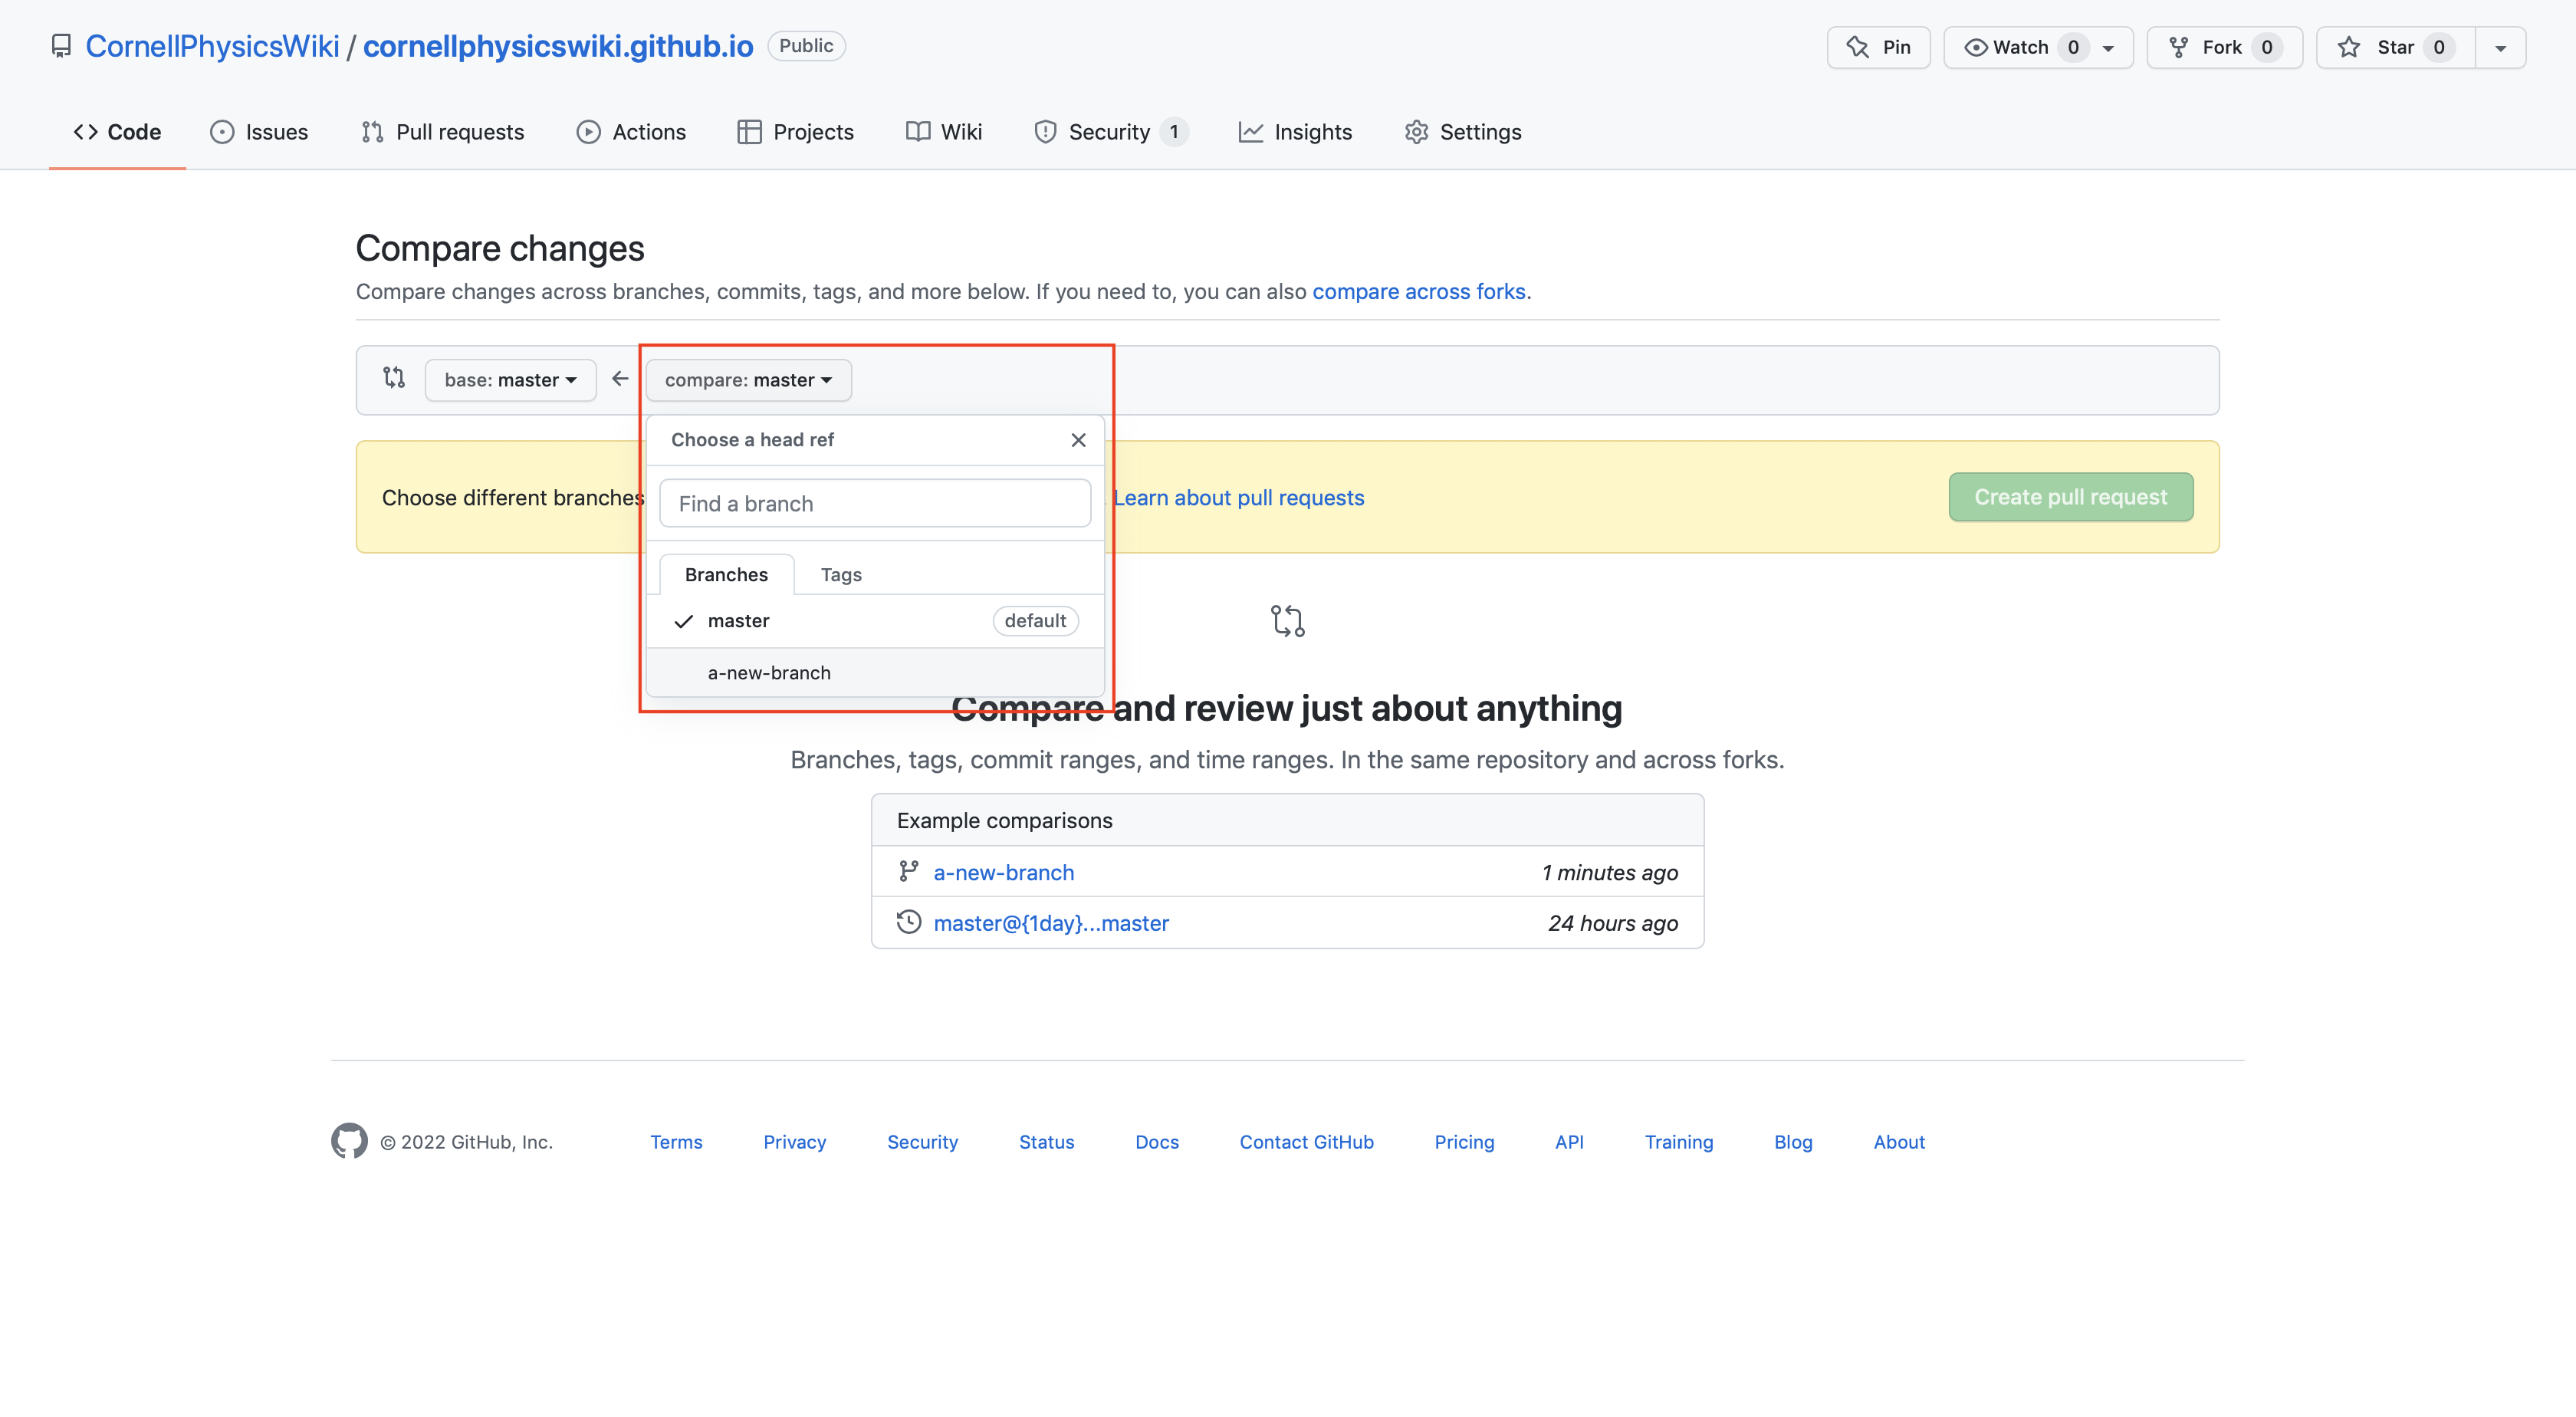
Click “Create pull request”. You should be redirected to a new page similar to the one below.
Enter some comments about your changes so that the website administrators/reviewer knows what changes you made. On the right, you will need to add at least one reviewer. This reviewer must be a website administrator and can be any of the people below:
- Fatima Yousuf (fatimayousuf)
- Colin Murphy (colincmurphy)
- Ved Sriraman (sriramanved)
- Ariel Marxena (arixena24)
- Stella Dang (stelladang)
- Devisree Tallapaneni (devisreet)
Click “Create Pull Request”. You’re reviewer might suggest some edits to your changes. Once your changes are approved, the website will be updated. Most of the time, as soon as we get around to reviewing your changes, we’ll just accept them.
Congratulations, you’re a contributor! If you’ve never done this before, then even better—you’ve just made your first contribution to open source.
If you want to add yourself to the contributors list, feel free to edit the file contributors.md and add your name.
Joining the Team
As you’ve no doubt noticed, this is a student-run wiki. We do have some reviewing and moderation—this is just to keep out spam, and so that we can introduce people to open source/Git as well. If you’re interested in working with us, drop us an email!